# Otter API documentation for AI agents
Generated: 2026-09-15T12:04:55.770Z
OpenAPI: https://connect.tryotter.com/docs/openapi/public-api.yaml
Discovery: https://connect.tryotter.com/docs/llms.txt
MCP: https://connect.tryotter.com/docs/mcp
Cancel a delivery
# Cancel a delivery
Cancel an in-flight delivery when Otter requests it before the job is fulfilled.
## Before you begin
- Active delivery with known `deliveryReferenceId`
- [Create a delivery](delivery-integrations-creation-flow.md) flow in place
## Steps
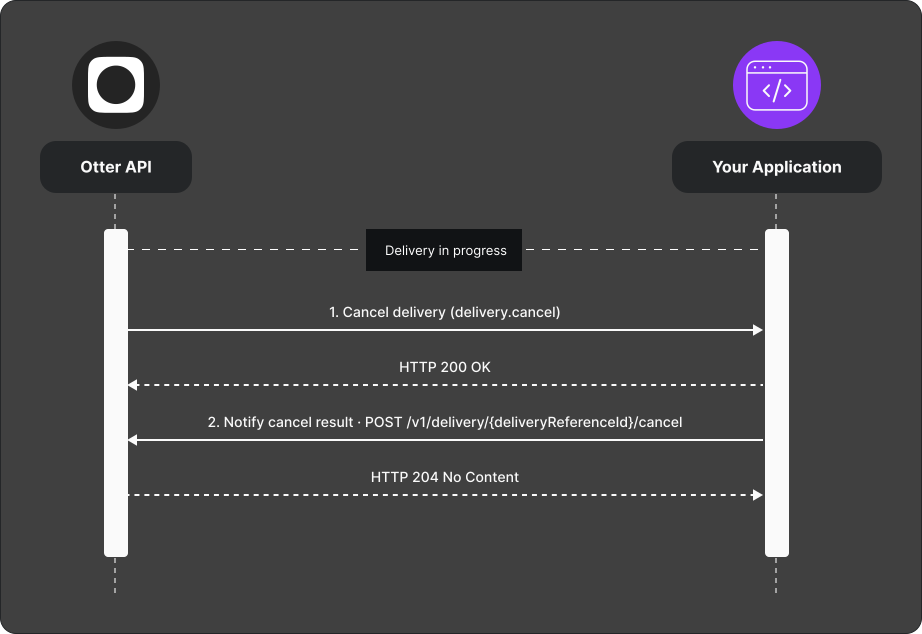
1. Otter sends a [Cancel delivery (`delivery.cancel`)](/docs/api-reference/reference/cancel-delivery-webhook) webhook.
2. Process cancel on your logistics side.
3. When cancellation succeeds, POST the result to [`POST /v1/delivery/{deliveryReferenceId}/cancel`](/docs/api-reference/reference/cancel-delivery-callback). Respond promptly; Otter currently waits up to 45 seconds.
4. When cancellation fails, use [`POST /v1/delivery/callback/error`](/docs/api-reference/reference/delivery-callback-error). The cancellation callback has no decline state.
## Verify
Cancel a test delivery and confirm the success callback returns `204`. Replay
the stored callback with the same event ID and confirm it returns `409`.
## Next
- [Delivery overview](delivery-integrations-operations.md)
Create a delivery
# Create a delivery
Quote, accept, and update a delivery job until it is completed or canceled.
## Before you begin
- Delivery webhooks configured and [signatures validated](guides-webhook-authentication.md)
- Callback endpoints implemented per [API reference](/docs/api-reference/reference/otter-api)
## Steps
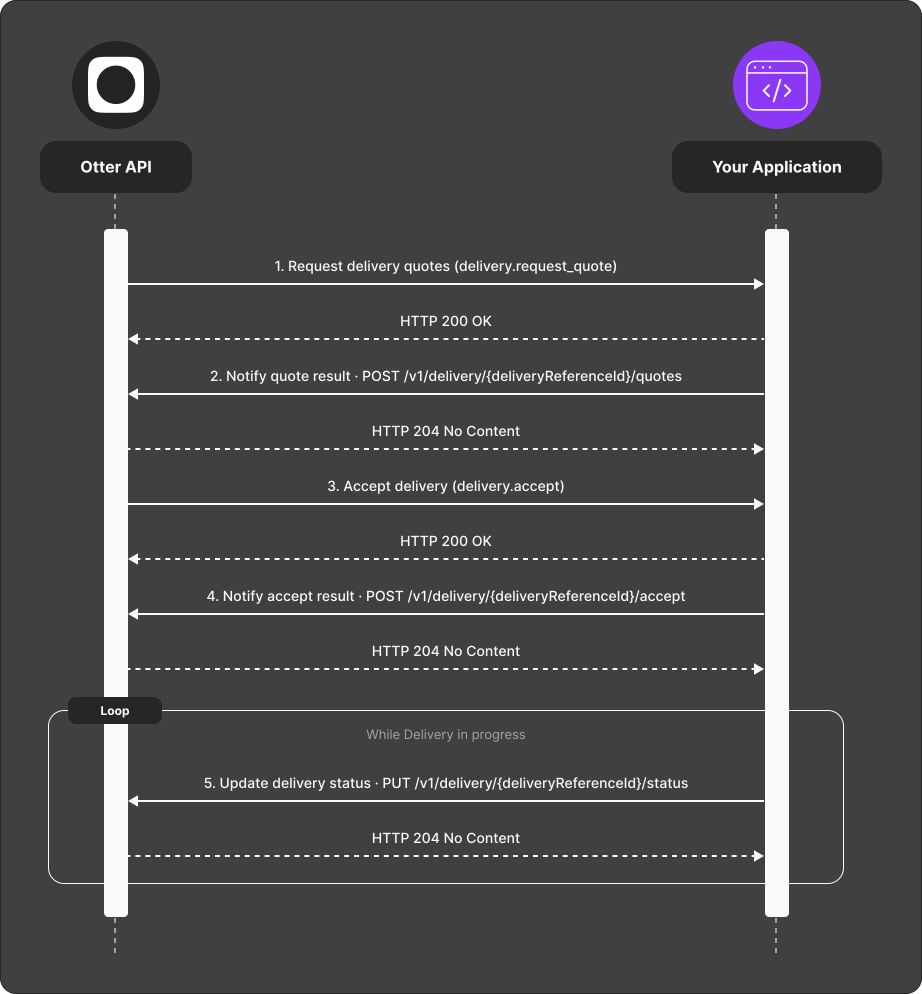
1. Otter requests quotes via [Request delivery quotes (`delivery.request_quote`)](/docs/api-reference/reference/request-delivery-quotes-webhook).
2. Respond through [`POST /v1/delivery/{deliveryReferenceId}/quotes`](/docs/api-reference/reference/request-delivery-quote-callback):
- Send `availability: AVAILABLE` with fare and pickup estimates when you can fulfill the delivery.
- Send `availability: UNAVAILABLE` with an optional `unavailableReason` when you cannot fulfill it. Omit pricing and pickup estimates.
- Respond promptly. Otter currently waits up to 45 seconds for the correlated result.
3. When Otter accepts a quote, receive [Accept delivery (`delivery.accept`)](/docs/api-reference/reference/accept-delivery-webhook).
4. When delivery creation succeeds, acknowledge it with [`POST /v1/delivery/{deliveryReferenceId}/accept`](/docs/api-reference/reference/accept-delivery-callback). If creation fails, use [`POST /v1/delivery/callback/error`](/docs/api-reference/reference/delivery-callback-error); the accept callback has no decline state.
5. Until terminal state, send updates via [`PUT /v1/delivery/{deliveryReferenceId}/status`](/docs/api-reference/reference/update-delivery-status) (status, addresses, courier, vehicle, notes).
Quotes do not expose a fixed time-based validity duration. A quote remains
eligible while its internal state is pending; a new quote request supersedes
earlier pending quotes.
**Typical lifecycle:** `ALLOCATED` → `PICKED_UP` → `COMPLETED`. You may send
`CANCELED`, and Otter accepts some updates with intermediate statuses omitted.
A `204` status response means the update was queued, not that the final state
was applied.
## Verify
Run both paths:
- Available: quote → accept → picked up → completed.
- Unavailable: quote callback returns `UNAVAILABLE`; no delivery is accepted.
- Replay a stored callback with the same event ID and confirm that it returns
`409` instead of creating another result.
## Next
- [Cancel a delivery](delivery-integrations-cancellation-flow.md)
- [Handle delivery update requests](delivery-integrations-update-request-flow.md)
- [Handle delivery errors](delivery-integrations-error-event-flow.md)
- [Delivery overview](delivery-integrations-operations.md)
Handle delivery errors
# Handle delivery errors
Report processing failures during async delivery work so users see a clear message.
## Before you begin
- You accepted a delivery webhook but cannot complete quote, accept, update, or cancel
## Steps
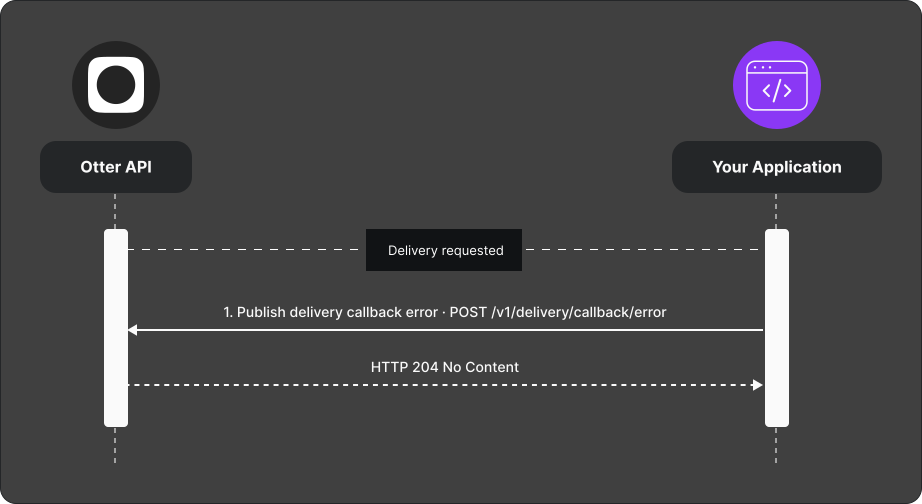
1. Process a delivery operation asynchronously.
2. On failure, `POST` to [`/v1/delivery/callback/error`](/docs/api-reference/reference/delivery-callback-error) with a user-friendly description and error code ([gRPC status codes](https://grpc.github.io/grpc/core/md_doc_statuscodes.html) are used).
## Verify
Force a known failure; confirm Otter surfaces your message.
## Next
- [Delivery overview](delivery-integrations-operations.md)
Delivery
# Delivery
Coordinate delivery quotes, job creation, live updates, and cancellation with your courier or logistics partner.
## Overview
Otter requests quotes and delivery jobs via webhooks. Your app responds through callback endpoints and streams status updates until the delivery completes or cancels.
## Integration overview
1. **Quote** — [Request delivery quotes (`delivery.request_quote`)](/docs/api-reference/reference/request-delivery-quotes-webhook) in; [`POST /v1/delivery/{deliveryReferenceId}/quotes`](/docs/api-reference/reference/request-delivery-quote-callback) out with `AVAILABLE` plus estimates or `UNAVAILABLE` plus an optional reason.
2. **Create** — [Accept delivery (`delivery.accept`)](/docs/api-reference/reference/accept-delivery-webhook); acknowledge successful creation through [`POST /v1/delivery/{deliveryReferenceId}/accept`](/docs/api-reference/reference/accept-delivery-callback).
3. **Updates** — [`PUT /v1/delivery/{deliveryReferenceId}/status`](/docs/api-reference/reference/update-delivery-status) for status, address, courier, vehicle, notes.
4. **Update request** — [Update delivery request (`delivery.update_request`)](/docs/api-reference/reference/update-delivery-request-webhook) in; [`POST /v1/delivery/{deliveryReferenceId}/update`](/docs/api-reference/reference/update-delivery-request-callback) out — see [Handle delivery update requests](delivery-integrations-update-request-flow.md).
5. **Cancel** — [Cancel delivery (`delivery.cancel`)](/docs/api-reference/reference/cancel-delivery-webhook) in; [`POST /v1/delivery/{deliveryReferenceId}/cancel`](/docs/api-reference/reference/cancel-delivery-callback) out — see [Cancel a delivery](delivery-integrations-cancellation-flow.md).
6. **Errors** — [`POST /v1/delivery/callback/error`](/docs/api-reference/reference/delivery-callback-error) — see [Handle delivery errors](delivery-integrations-error-event-flow.md).
A typical lifecycle is `ALLOCATED` → `PICKED_UP` → `COMPLETED`, or
`CANCELED`. Otter accepts some updates with intermediate statuses omitted, so
do not depend on synchronous validation of the complete sequence.
Quote, accept, and cancel callbacks return `204` after the correlated result is
stored. A duplicate callback with the same event ID returns `409`. Accept and
cancel callbacks represent success only; report failures through the delivery
error callback.
## Related
- [Create a delivery](delivery-integrations-creation-flow.md)
- [Handle delivery update requests](delivery-integrations-update-request-flow.md)
- [API reference](/docs/api-reference/reference/otter-api)
## Next
Implement [Create a delivery](delivery-integrations-creation-flow.md) before live traffic.
Handle delivery update requests
# Handle delivery update requests
Respond when Otter asks you to revise an in-flight delivery (cost, pickup, payments, or tip).
## Before you begin
- Delivery webhooks configured and [signatures validated](guides-webhook-authentication.md)
- Ability to call [`POST /v1/delivery/{deliveryReferenceId}/update`](/docs/api-reference/reference/update-delivery-request-callback) with scope `delivery.provider`
## Steps
1. Receive the [Update delivery request (`delivery.update_request`)](/docs/api-reference/reference/update-delivery-request-webhook) webhook (payload includes `deliveryReferenceId` and the revised fields Otter is requesting).
2. Apply the change on your courier / logistics side.
3. The callback is optional for completion of Otter's update-request operation.
If you send it, call [`POST /v1/delivery/{deliveryReferenceId}/update`](/docs/api-reference/reference/update-delivery-request-callback), include updated cost or currency when applicable, and send the original event's `X-Event-Id`.
4. Continue normal status updates with [`PUT /v1/delivery/{deliveryReferenceId}/status`](/docs/api-reference/reference/update-delivery-status) until a terminal state.
## Verify
Trigger an update request and confirm the delivery continues to completion or
cancel. If you send the optional callback, confirm it returns **204**.
## Common failures
| Symptom | Likely cause | Fix |
|---|---|---|
| **404** on callback | Wrong `deliveryReferenceId` or store | Use ids from the webhook and `X-Store-Id` for the linked store |
| **422** | Body missing required update fields | Match the callback schema in the [API reference](/docs/api-reference/reference/otter-api) |
## Next
- [Create a delivery](delivery-integrations-creation-flow.md)
- [Cancel a delivery](delivery-integrations-cancellation-flow.md)
- [Delivery overview](delivery-integrations-operations.md)
Direct Order
# Direct Order
Query orders placed by an eater through your direct-order channel.
## Overview
Direct Order integrations let you list an eater’s orders in reverse chronological order for account history, support, or reconciliation flows.
## What you can call
| Capability | Notes |
|---|---|
| Query eater orders | Orders for the authenticated eater, newest first |
See [API reference](/docs/api-reference/reference/otter-api) for authentication, pagination, and response shape.
## Next
Confirm Direct Order is enabled for your application with your Account Representative, then exercise the query endpoint.
Finance
# Finance
Post financial transaction data for orders after checkout so Otter has payout, fee, tax, and adjustment detail.
## Overview
After an order is created and financials are finalized on your side, send a
financial transaction payload. `202 Accepted` means that synchronous validation
passed and the payload was published to Otter's ingestion queue. It does not
confirm downstream validation, order association, or persistence.
## Integration overview
1. Create the order ([`POST /v1/orders`](/docs/api-reference/reference/create-order)) if not already in Otter.
2. When financial data is ready, [`POST /finance/v1/financial-transactions`](/docs/api-reference/reference/post-financial-transactions).
3. While `pending` is `true`, you may resubmit the same endpoint to correct or
update data. Keep the external transaction ID and store ID stable. Invoice
transaction identity also includes the payout ID.
The API does not currently expose ingestion status after the payload is queued.
Retain the submitted payload and your external transaction identifiers for
reconciliation.
Submissions with the same identity values update the existing transaction.
Changing an identity value may create a separate record. A referenced order is
not looked up synchronously, so `202` does not prove that the order association
will succeed.
Restaurant-funded and service-provider discounts are stored as negative values
even when submitted as positive values. Other monetary categories retain the
submitted sign.
See [Financial transactions](financial-transaction-flow.md) for the sequence.
## Related
- [API reference](/docs/api-reference/reference/otter-api)
## Next
Walk through [Financial transactions](financial-transaction-flow.md) with a test order.
Financial transactions
# Financial transactions
Send order financials to Otter after the order concludes.
## Before you begin
- Order exists in Otter (typically via [`POST /v1/orders`](/docs/api-reference/reference/create-order))
- Financial breakdown ready on your side
## Steps
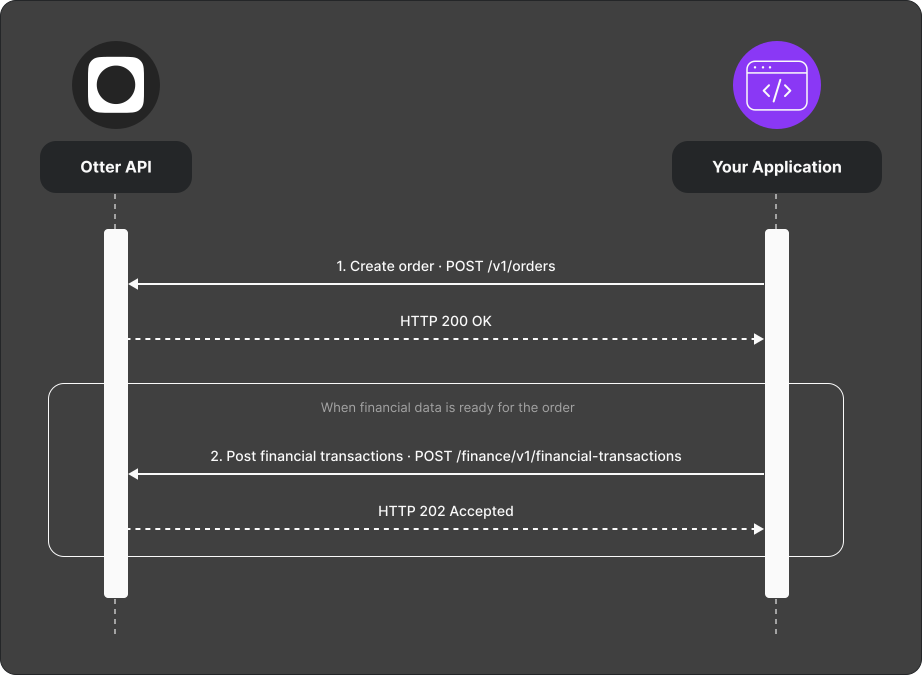
1. Create the order with [`POST /v1/orders`](/docs/api-reference/reference/create-order) if needed.
2. Post financial data with [`POST /finance/v1/financial-transactions`](/docs/api-reference/reference/post-financial-transactions).
3. Expect **HTTP 202** — synchronous validation passed and the payload was
published to the ingestion queue. This is not confirmation of downstream
validation, order association, or persistence.
4. While `pending` is `true`, resubmit to fix or update the same transaction.
Preserve the external transaction ID and store ID. For invoice transactions,
preserve the payout ID as well.
The same identity values update an existing transaction. Changing an identity
value may create a separate transaction. Although `pending: false` indicates a
finalized transaction, the current ingestion API does not reject a later
submission with the same identifier.
## Verify
Post a test transaction and receive 202. Retain the submitted external
transaction identifiers for reconciliation. Resubmit with `pending: true` and
confirm the update is accepted.
Also test a wrong external order ID. The request can still return `202` because
order association happens downstream; use this to verify your reconciliation
controls rather than treating queue acceptance as completion.
## Next
- [Finance overview](finance-integration-operations.md)
- [API reference](/docs/api-reference/reference/otter-api)
Use these docs with AI
# Use these docs with AI
Connect Cursor, Claude Code, and similar tools to the live Otter guides and API reference — so generated code matches the current contract, not training-data guesses.
Use these docs programmatically through AI assistants, code editors, and Model Context Protocol (MCP). The MCP is read-only documentation search. It does not call the Otter API or access your account.
## Quick access
Start with one of these:
- Fetch [`llms.txt`](https://connect.tryotter.com/docs/llms.txt) first. That manifest links the OpenAPI contract, the full guide corpus, and the MCP endpoint.
- Connect the MCP server at `https://connect.tryotter.com/docs/mcp` (Streamable HTTP).
- If your tool cannot use MCP, follow the static artifact URLs in [`llms.txt`](https://connect.tryotter.com/docs/llms.txt).
Pages across this site also expose the same discovery links in HTML (``) and in [`robots.txt`](https://connect.tryotter.com/docs/robots.txt).
## Use our MCP server
One server covers both layers: guides (the why and how) and the OpenAPI contract (exact paths, scopes, and payloads).
| Server | URL | What it covers |
| --- | --- | --- |
| `otter-docs` | `https://connect.tryotter.com/docs/mcp` | Integration guides, API operations, webhook payloads, and shared schemas |
Tools: `search_docs`, `get_guide`, `get_openapi`. After connect, the client shows the server as `otter-partner-docs`.
### Connect with Claude Code
Run this in the project directory:
```bash
claude mcp add --transport http otter-docs https://connect.tryotter.com/docs/mcp
```
That add is project-scoped. To use the server in every project:
```bash
claude mcp add --transport http otter-docs --scope user https://connect.tryotter.com/docs/mcp
```
### Connect with Claude Desktop
1. Open Claude Desktop.
2. Go to **Settings → Connectors**.
3. Add a custom connector named `otter-docs` with URL `https://connect.tryotter.com/docs/mcp`.
Or merge this into `.mcp.json` in the project root, or into Claude Desktop `claude_desktop_config.json`:
```json
{
"mcpServers": {
"otter-docs": {
"type": "http",
"url": "https://connect.tryotter.com/docs/mcp"
}
}
}
```
### Connect with Codex CLI
```bash
codex mcp add otter-docs --url https://connect.tryotter.com/docs/mcp
```
### Connect with Cursor
Save as `.cursor/mcp.json` in your project, or merge into `~/.cursor/mcp.json`:
```json
{
"mcpServers": {
"otter-docs": {
"url": "https://connect.tryotter.com/docs/mcp"
}
}
}
```
Restart Cursor after you save.
### Connect with VS Code
Save as `.vscode/mcp.json`:
```json
{
"servers": {
"otter-docs": {
"type": "http",
"url": "https://connect.tryotter.com/docs/mcp"
}
}
}
```
### Generic Streamable HTTP
If your client only needs the URL:
```text
https://connect.tryotter.com/docs/mcp
```
## Verify
After the client connects, you should see a server named `otter-partner-docs` with three tools. A typical initialize payload looks like:
```json
{
"jsonrpc": "2.0",
"id": 1,
"result": {
"protocolVersion": "2024-11-05",
"serverInfo": {
"name": "otter-partner-docs",
"version": "1.0.0"
},
"capabilities": {
"tools": {}
}
}
}
```
`tools/list` should return `search_docs`, `get_guide`, and `get_openapi`.
Smoke-test from the client chat:
1. Ask: `Use search_docs to find ping`.
2. Expect a JSON result with `results` that include a `ping` operation or webhook and a `url` under `https://connect.tryotter.com/docs/`.
3. Ask: `Call get_openapi`.
4. Expect a JSON body like this (the version string comes from the live contract):
```json
{
"url": "https://connect.tryotter.com/docs/openapi/public-api.yaml",
"openapiVersion": "v1"
}
```
5. Ask: `Call get_guide with slug guides-authentication`.
6. Expect the Authentication guide body and a canonical `url`.
Then implement against the linked guide or API reference page — not against memorized paths.
## Common failures
| Symptom | Likely cause | Fix |
| --- | --- | --- |
| Initialize hangs | Wrong transport or a trailing path segment | Use exactly `https://connect.tryotter.com/docs/mcp` over Streamable HTTP, not stdio |
| Server connects, no tools | Client did not reload config | Restart the client after you save the file |
| Answers ignore the contract | Agent guessed from training data | Ask it to call `search_docs`, then open the returned URL before writing code |
## Static artifacts
These are real files on the docs host. Use the URL in the table — do not add a trailing slash.
Per-guide Markdown also lives at `https://connect.tryotter.com/docs/agent-guides/.md`.
## Next
- [Complete the Quickstart](guides-quickstart.md) before building your first integration.
- [Understand authentication](guides-authentication.md) before requesting access tokens.
- [Explore the API reference](/docs/api-reference/reference/otter-api/) for the current contract.
Authentication
# Authentication
How your app proves who it is when calling the Otter API — and how you verify that inbound webhooks really came from Otter.
There are **two directions**:
| Direction | What you do | Primary mechanism |
|---|---|---|
| **Outbound** — your app → Otter | Call REST endpoints | OAuth 2.0 access token as `Authorization: Bearer …` |
| **Inbound** — Otter → your app | Receive webhooks | Validate `X-HMAC-SHA256` on every request |
Exact token request/response fields live in the [API reference](/docs/api-reference/reference/otter-api). Code samples for webhook HMAC live in [Keep webhooks secure](guides-webhook-authentication.md).
## Application credentials
Your Account Representative registers an **application** and gives you:
- **Client ID** (Application ID / Partner ID in older materials — same value)
- **Client secret**
Never commit secrets to source control or expose them in a browser or mobile app.
See [Quickstart](guides-quickstart.md) to obtain credentials and complete a first call.
## Calling the Otter API (outbound)
### Access tokens
Request an access token from [`POST /v1/auth/token`](/docs/api-reference/reference/request-token) using your Client ID and client secret.
Two common OAuth 2.0 flows:
| Flow | When to use |
|---|---|
| **Client credentials** | Server-to-server integration — no end-user login. Most partner integrations start here. |
| **Authorization code** | A merchant user must authorize your app (for example [organization onboarding](organization-integrations-onboarding-flow.md)). Starts at [`GET /v1/auth/oauth2/authorize`](/docs/api-reference/reference/oauth-2-authorize), then exchange the code at [`/v1/auth/token`](/docs/api-reference/reference/request-token). |
Example shape (client credentials):
```bash title="Request an access token"
curl --request POST 'https://partners.tryotter.com/v1/auth/token' \
--header 'Content-Type: application/x-www-form-urlencoded' \
--data-urlencode 'scope=ping' \
--data-urlencode 'grant_type=client_credentials' \
--data-urlencode 'client_id=[CLIENT_ID]' \
--data-urlencode 'client_secret=[CLIENT_SECRET]'
```
The response includes `access_token`, `token_type` (`bearer`), and `expires_in`.
Access tokens are valid for **30 days by default**. Always treat the returned
`expires_in` value, in seconds, as authoritative and request a new token before
that value elapses.
### Request headers
On resource calls:
```http title="Authenticated store-scoped request"
Authorization: Bearer
X-Store-Id:
```
- **`Authorization`** — required on resource endpoints.
- **`X-Store-Id`** — required on store-scoped endpoints. Send the store identifier
from **your system** that is linked to the authenticated application. See
[Stores and connections](guides-stores-and-connections.md) and
[Quickstart — connect stores](guides-quickstart.md#step-3-connect-your-stores).
### Scopes
Tokens and applications are limited by **scopes** (for example organization or orders scopes). Request only what you need. Missing scope → authorization errors even with a valid token. Scope lists are in the [API reference](/docs/api-reference/reference/otter-api).
### Transient 401s
Occasionally a valid token can return **401** during internal auth edge cases. Prefer a short retry with backoff for known-good tokens, or request a new token — see the auth notes in the API reference.
## Verifying webhooks (inbound)
Otter sends HTTPS `POST` events to URLs you register. Each endpoint has a **secret** and an optional `Authorization` style (Basic, Bearer, legacy HMAC SHA1, or none).
**Always** validate the **`X-HMAC-SHA256`** header (HMAC-SHA256 of the **raw** body with your webhook secret) before trusting the payload — regardless of `Authorization` type.
> Do not process webhook bodies without signature validation.
Deep guide with algorithms and multi-language samples: **[Keep webhooks secure](guides-webhook-authentication.md)**. Event model (ack, retries, error callbacks): **[Events and webhooks](guides-events-and-webhooks.md)**.
## Related
- [Quickstart](guides-quickstart.md) — first token, store header, webhook registration
- [Events and webhooks](guides-events-and-webhooks.md) — REST vs webhooks, ack, error callbacks
- [Stores and connections](guides-stores-and-connections.md) — pairing and `X-Store-Id`
- [Keep webhooks secure](guides-webhook-authentication.md) — HMAC how-to and samples
- [Understand rate limits](guides-rate-limiting.md)
- [Otter 101](otter-101.md)
- [API reference — auth](/docs/api-reference/reference/otter-api)
## Next
Wire client-credentials tokens, then complete [Events and webhooks](guides-events-and-webhooks.md) and [Keep webhooks secure](guides-webhook-authentication.md) before live traffic.
API behavior and feature status
# API behavior and feature status
Use this page to distinguish production contracts from behavior that still
requires product-specific confirmation.
The Otter API is available on the production host
`https://partners.tryotter.com`. Validate integrations with controlled
production test stores and low-risk test data.
## Production contracts
| Area | Contract |
|---|---|
| Authentication | Access tokens are valid for 30 days by default. The returned `expires_in` value is authoritative. |
| Store scope | `X-Store-Id` is the store identifier from your system that is linked to the authenticated application. |
| Webhook correlation | The JSON `eventId` and `X-Event-Id` header contain the same UUID. Use it for deduplication and callbacks. |
| Order creation | `externalIdentifiers.id` is the stable order identity. A duplicate create returns `409 Conflict` and does not create another order. |
| Order paths | `{orderId}` is the external order identifier your app supplied at creation. |
| Order status updates | The status endpoint accepts `PREPARED`, `CANCELED`, and `FULFILLED`. `202 Accepted` means that Otter found the order and queued the update; it does not confirm that downstream processing completed. |
| Order acceptance windows | Otter API services have no default acceptance or automatic-rejection deadline. When an integration has an acceptance window, it is configured for that integration during onboarding. A UI accept-button window is separate from server-side automatic rejection. |
| Order cancellation callbacks | An intent-to-cancel webhook can be acknowledged only by posting `CANCELED` with the matching `X-Event-Id`. The API has no cancellation-decline callback state. |
| Order status webhooks | Status webhooks expose accepted, ready-to-pickup, handed-off, and fulfilled events. They do not expose rejected or canceled status events. |
| Menu replacement | [`POST /v1/menus`](/docs/api-reference/reference/upsert-menu) replaces the complete menu snapshot. Omitted customer-menu entities are deleted. |
| Menu jobs | A menu upsert returns `202 Accepted` with a pending job. Poll until `SUCCESS` or `FAILED`; the response does not confirm that menus or photos were persisted. |
| Delivery callbacks | A quote callback supports `AVAILABLE` with estimates or `UNAVAILABLE` with an optional reason. Accept and cancel callbacks represent success only; use the delivery error callback for failures. A stored callback returns `204`, while a duplicate event ID returns `409`. |
| Delivery status | A `204` status response means the update was accepted for asynchronous processing. Intermediate lifecycle statuses are not synchronously required. |
| Account Pairing | **Deprecated.** Store onboarding and status endpoints under Account Pairing may be removed in a future release. Prefer current store-connection guidance from your Otter representative. |
| Reports | **Deprecated.** Date boundaries are inclusive UTC calendar dates. Downloads are comma-delimited UTF-8 CSV. Each generate request creates a new job, and polling by `jobId` is the reconciliation path when a best-effort webhook is missed. Otter returns `EXPIRED` two days after workflow completion. Contact your Otter representative for migration options. |
| Reviews | An immediate reply returns the target service's opaque `replyId` after the provider accepts it. A scheduled reply confirms scheduling only, provides no eventual `replyId`, and may execute after the requested epoch-second timestamp. |
| Finance ingestion | `202 Accepted` means synchronous validation passed and the payload was published to the ingestion queue. It does not confirm downstream processing completion, including validation, order association, or persistence. Stable transaction identifiers update an existing record instead of creating a duplicate. |
## Preview behavior
Treat the following behavior as **Preview**. Do not make it a hard dependency
until your Otter representative confirms the contract for your application.
| Area | Behavior that is not yet a public guarantee |
|---|---|
| Orders | Integration-specific acceptance-window values, scheduled-order acceptance timing, cancellation no-response handling, preparation-time anchors, supported currencies and rounding, and any future synchronous status-transition policy |
| Webhooks | End-to-end replay limits, global ordering, exhaustion handling, and retention outside one sender execution |
| Delivery | A product-level quote-validity promise, whether the current callback wait is a stable SLA, accept/cancel decline representation, failure and return states, read reconciliation, and compensation guarantees |
| Menus | Inbound payload/entity/photo limits, availability behavior for template-enabled stores, complete template-menu restrictions, idempotency, and ambiguous-response recovery |
| Reports | Output timezone for timestamp columns, `ORDER_STORES` row ordering, and a cross-flow null-serialization guarantee |
| Reviews | Per-service reply-size discovery, scheduling lateness, scheduled-operation status or callbacks, edits/deletes, retry policy, and idempotency |
| Finance | Partner-visible processing status, retry and completion SLAs, correction finality, supported currencies and rounding, and failure reconciliation |
| Organization | Whether every organization-created connection emits the same webhook sequence as account pairing |
| API lifecycle | Support targets, certification policy, incident communication, credential-rotation procedure, PII retention, versioning, and deprecation notice periods |
## How to integrate with Preview behavior
1. Keep Preview-dependent code behind a feature flag or configuration.
2. Capture request IDs, event IDs, external resource IDs, and submitted payloads.
3. Ask your Otter representative to confirm the behavior for your application.
4. Promote the dependency only after it is represented in the API reference or
this guide.
## Related
- [Authentication](guides-authentication.md)
- [Events and webhooks](guides-events-and-webhooks.md)
- [Integration scenarios](scenarios.md)
- [API reference](/docs/api-reference/reference/otter-api)
## Next
Implement only the production contracts required for your integration, then use
the scenario checklist for controlled production-store validation.
Events and webhooks
# Events and webhooks
How Otter notifies your app when something happens outside a REST call you started — and how you should respond.
REST is how **you** initiate work. **Webhooks** are how Otter notifies you of work that started elsewhere (restaurant accept, menu publish request, store pause, report ready, and so on).
## REST vs webhooks
| | REST (your app → Otter) | Webhooks (Otter → your app) |
|---|---|---|
| Who starts | You | Otter or the restaurant |
| Typical use | Create an order, upsert a menu, pause a store | Status changed, publish requested, credentials needed |
| Auth | Bearer access token | Validate `X-HMAC-SHA256` (see [Authentication](guides-authentication.md)) |
| Response | HTTP status for your request | **2xx** quickly; process asynchronously |
Most Integrations hubs use **both**.
## Event lifecycle
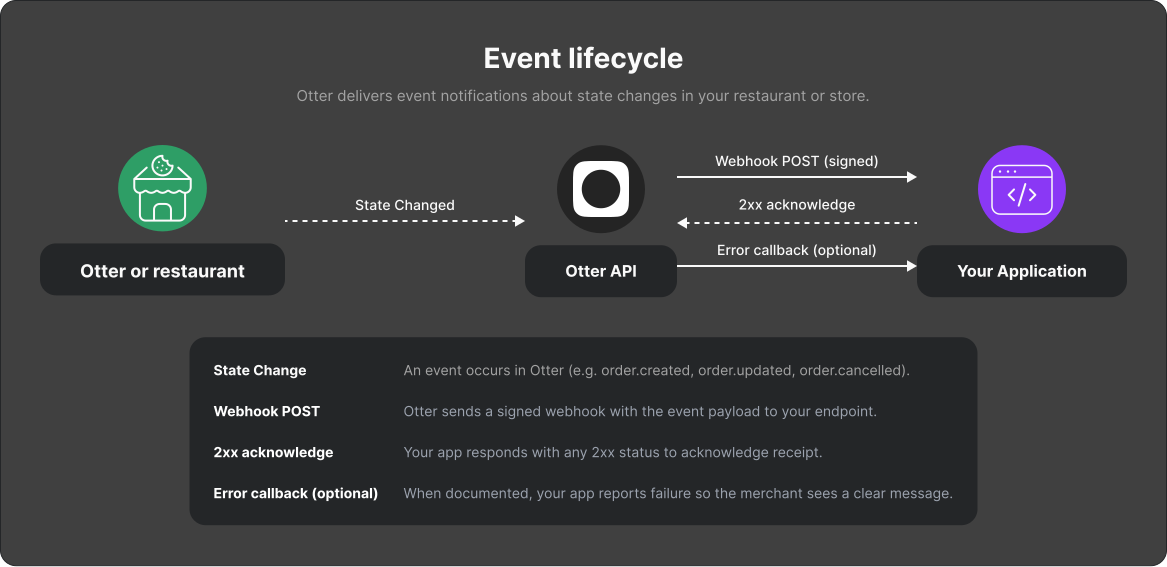
1. Something changes in Otter (or a merchant action triggers it).
2. Otter `POST`s a signed JSON payload to your registered HTTPS URL.
3. You validate the signature, return **2xx**, and queue work.
4. When a domain documents it, you may call an **error callback** so the merchant sees a clear failure (menus and delivery use this pattern).
Every outbound webhook includes the same UUID in the JSON body’s `eventId` field
and the `X-Event-Id` request header. Persist this value before acknowledging the
webhook. Send it back in callback endpoints that require `X-Event-Id`.
## Acknowledge quickly
- Return **2xx** as soon as the request is accepted for processing.
- Do heavy work (DB writes, partner APIs) **after** the response.
- Treat handlers as **idempotent**. The same event can arrive more than once
through replay or workflow recovery even after a successful acknowledgement.
## Delivery attempts and timeouts
For each webhook delivery execution, Otter:
- Applies a 30-second connection, read, write, and total call timeout.
- Makes up to three attempts only for DNS or socket failures.
- Waits approximately 100 ms before the second attempt and 500 ms before the third.
- Does not retry an HTTP error response in that sender execution.
Do not use these attempts as a business-workflow timer. Otter can replay work
outside this sender execution, so deduplicate with `eventId` and retain the
result of every processing attempt.
Payload shapes live in the [API reference](/docs/api-reference/reference/otter-api)
and each Integrations hub’s **Events** section.
## Error callbacks
Some domains require an explicit failure report when your side cannot complete the work Otter asked for:
| Domain | Pattern | Start here |
|---|---|---|
| Menus | [`POST /v1/callback/error`](/docs/api-reference/reference/publish-error) with event id + user-friendly reason | [Report a failed menu event](menus-integrations-failed-event-flow.md) |
| Delivery | [`POST /v1/delivery/callback/error`](/docs/api-reference/reference/delivery-callback-error) | [Handle delivery errors](delivery-integrations-error-event-flow.md) |
Use a **merchant-readable** reason. Silent failures leave restaurants stuck with no message in Otter.
## Security and registration
- Register HTTPS endpoints with your Account Representative (or via supported APIs where available).
- Each endpoint has a **secret** — validate **`X-HMAC-SHA256`** on every request.
Deep how-to and code samples: **[Keep webhooks secure](guides-webhook-authentication.md)**.
## Related
- [Authentication](guides-authentication.md) — tokens outbound; webhook verify inbound
- [Find an event ID](guides-find-event-id.md) — correlate callbacks, logs, and retries
- [Keep webhooks secure](guides-webhook-authentication.md) — HMAC algorithms and samples
- [Quickstart — register webhooks](guides-quickstart.md#step-4-register-webhooks-and-verify-signatures)
- [Otter 101](otter-101.md)
## Next
Implement signature validation ([Keep webhooks secure](guides-webhook-authentication.md)), then subscribe to the event types listed on your Integrations hub Overview.
Find an event ID
# Find an event ID
Use the `eventId` at the top level of a webhook payload to correlate the event with callbacks, logs, and retries.
## Before you begin
- Configure an HTTPS endpoint to receive Otter webhooks.
- [Validate the webhook signature](guides-webhook-authentication.md) before processing the body.
- Keep the original payload available in your logs or event-processing record.
## Steps
1. Inspect the JSON body sent to your webhook endpoint.
```json title="Webhook payload"
{
"eventId": "cf0ce51b-d74e-40d3-b177-1925ab4edc0c",
"eventTime": "2026-07-23T14:32:18Z",
"eventType": "ping.ping",
"metadata": {
"storeId": "partner-store-123",
"applicationId": "ad4ff59d-04c0-4c7d-8ca3-e3a673f8443d",
"payload": {
"message": "Hello World"
}
}
}
```
2. Read `eventId` from the root of the payload. In the example, the event ID is
`cf0ce51b-d74e-40d3-b177-1925ab4edc0c`.
Do not use these other identifiers in its place:
| Field | What it identifies |
|---|---|
| `eventType` | The kind of event, such as [Ping webhook (`ping.ping`)](/docs/api-reference/reference/ping-webhook) |
| `metadata.resourceId` | The resource affected by the event |
| `metadata.storeId` | The store in your system |
3. Store the event ID with your processing result. Use it as an idempotency key so a retry does not run the same work twice.
4. When an endpoint asks which event you are responding to, send the same value in the `X-Event-Id` request header. For example, the [menu error callback (`POST /v1/callback/error`)](/docs/api-reference/reference/publish-error) requires this header.
## Verify
Confirm that:
- your webhook log contains the top-level `eventId`;
- retries with the same event ID do not duplicate work;
- any callback `X-Event-Id` header exactly matches the webhook value.
## Common failures
| Symptom | Likely cause | Fix |
|---|---|---|
| Callback rejects the event ID | A resource or store ID was sent instead | Copy the top-level `eventId` unchanged |
| You cannot find an event ID | Only `metadata.payload` was logged | Log the complete webhook envelope after validating its signature |
| A retry creates duplicate work | The handler does not deduplicate events | Persist `eventId` and check it before processing |
## Next
- [Understand events and webhooks](guides-events-and-webhooks.md)
- [Keep webhooks secure](guides-webhook-authentication.md)
- Review the payload for the webhook you consume in the [API reference](/docs/api-reference/reference/otter-api)
Quickstart
# Quickstart
Get credentials, connect a store, call the Otter API, and receive a verified webhook — in one path.
By the end of this guide you will have application credentials, at least one linked store, a successful authenticated API call, and a webhook endpoint that validates Otter signatures.
## Before you begin
- A technical contact who can store secrets securely
- A publicly reachable **HTTPS** URL for webhooks (or a tunnel such as ngrok for local testing)
- Agreement with your **Account Representative** on which products you are building (orders, menus, storefront, and so on)
## Step 1: Register your application
External partners need a registered **application** before calling the Otter API. Registration is manual.
1. Contact your Account Representative and ask them to register your application.
2. You receive:
- **Application ID** (also called Partner ID in older materials — treat them as the same)
- **Client secret**
3. Store the client secret in your secrets manager. Never commit it to source control or expose it in a browser or mobile app.
### Verify
You have Application ID and client secret stored securely. See the [API reference](/docs/api-reference/reference/otter-api) for authentication and base URLs.
## Step 2: Authenticate and make your first call
The Otter API uses **OAuth 2.0** access tokens. Most partner apps start with the **client credentials** flow. See **[Authentication](guides-authentication.md)** for flows, headers, scopes, and webhook verification.
1. Obtain an access token from [`POST /v1/auth/token`](/docs/api-reference/reference/request-token) using your Client ID and client secret (details in the [API reference](/docs/api-reference/reference/otter-api)).
2. Call a simple authenticated endpoint with:
```http title="Authorization header"
Authorization: Bearer
```
3. Confirm you get a successful response before wiring a full workflow.
### Verify
A successful authenticated response with your credentials means the application is wired correctly.
## Step 3: Connect your stores
Every restaurant location your app acts on must be paired with Otter. Store-scoped requests send the Otter store identity in `X-Store-Id`. Pairing paths (Account Representative, account pairing APIs, organization OAuth): **[Stores and connections](guides-stores-and-connections.md)**.
1. Ask your Account Representative to onboard each store, **or** automate pairing with [Organization onboarding](organization-integrations-onboarding-flow.md) when your product supports it.
2. After linking, note the store ID Otter expects for that location.
3. Send it on store-scoped requests:
```http title="Store-scoped request headers"
Authorization: Bearer
X-Store-Id:
```
### Verify
Call a store-scoped endpoint from the [API reference](/docs/api-reference/reference/otter-api) with `X-Store-Id` set. You should not get an unknown-store or authorization error for that header.
## Step 4: Register webhooks and verify signatures
Otter pushes events (order status, menu failures, storefront changes, and more) to HTTPS endpoints you control. Mental model (REST vs webhooks, ack, error callbacks): **[Events and webhooks](guides-events-and-webhooks.md)**.
1. Ask your Account Representative to register your webhook URL(s) and choose an authentication type per endpoint.
2. Save the webhook **secret** for each endpoint (Otter Developer Portal or your Account Representative).
3. Implement your receiver to:
- Accept `POST` with JSON
- Validate **`X-HMAC-SHA256`** on every request — see [Keep webhooks secure](guides-webhook-authentication.md)
- Return **2xx** quickly; do heavy work asynchronously
4. Subscribe to the event types your product needs.
### Verify
Trigger a test event (or complete a small flow that emits one). Your endpoint should receive the request, pass signature validation, and respond with `2xx`.
## Checklist
You're done when:
- [ ] Application ID + client secret stored securely
- [ ] Authenticated API call succeeds
- [ ] At least one store linked; `X-Store-Id` accepted
- [ ] Webhook URL registered; signature validation passes
## Common failures
| Symptom | Likely cause | Fix |
|---|---|---|
| 401 on API calls | Wrong secret or expired token | Confirm credentials; refresh the bearer token |
| Store errors on resource calls | Missing/wrong `X-Store-Id` or store not linked to this app | Re-check store onboarding; use the Otter-linked id |
| No webhooks | URL not registered, HTTP (not HTTPS), or firewall | Confirm Otter can reach the URL |
| Signature check fails | Wrong secret or hashing decoded/parsed body | Use the **raw** request body bytes — see [Keep webhooks secure](guides-webhook-authentication.md) |
| Frequent 429 | Hitting [rate limits](guides-rate-limiting.md) | Back off with jitter; contact your TAM if normal traffic is limited |
## Next
- **[Otter 101](otter-101.md)** — Core business concepts (organization, store, orders, menus, events)
- **[Authentication](guides-authentication.md)** — Tokens outbound; webhook verification inbound
- **[Events and webhooks](guides-events-and-webhooks.md)** / **[Stores and connections](guides-stores-and-connections.md)** — Shared primitives
- Pick an **Integrations** hub from the [Overview](overview.md) and follow its Integration overview
- **[Keep webhooks secure](guides-webhook-authentication.md)** and **[Understand rate limits](guides-rate-limiting.md)** before live traffic
Understand rate limits
# Understand rate limits
Stay within Otter API quotas so your integration remains reliable under load.
## Overview
The Otter API enforces rate limits so capacity stays fair across partners. Limits apply in two ways: by **IP address** and by **endpoint** (per store and application).
## IP address limits
Limits depend on whether the request is authenticated:
| Auth state | Limit |
|---|---|
| Authenticated | 20 requests per **second** per IP (all endpoints combined) |
| Unauthenticated | 3 requests per **minute** per IP |
## Endpoint limits
Authenticated endpoints are rate limited individually at the **store** level for your application. For example, one store for one application might be allowed a fixed number of calls per minute to a given endpoint.
Exact quotas depend on the endpoint. See the per-operation **Rate limit** note on each page in the [API reference](/docs/api-reference/reference/otter-api).
## When you hit a limit
- The API responds with **HTTP 429** until usage drops below the threshold.
- Back off and retry with jitter. Do not tight-loop on 429.
- If you hit limits often in normal traffic, contact your TAM to review quotas or redesign chatty patterns (batching, caching, fewer polling loops).
## Verify
Intentionally exceed a low-volume path only if you have a safe test plan. Confirm you receive `429` and that your client backs off. Prefer load testing against agreed quotas with your Account Representative.
## Next
- [API reference](/docs/api-reference/reference/otter-api) — per-operation rate limits
- [Keep webhooks secure](guides-webhook-authentication.md)
Stores and connections
# Stores and connections
How restaurant locations are linked to your application — and why store-scoped API calls need `X-Store-Id`.
A **store** is a single restaurant location. Most Otter API calls and webhooks are **store-scoped**: Otter must know which location you mean, and that location must be **connected** to your application.
## Hierarchy reminder
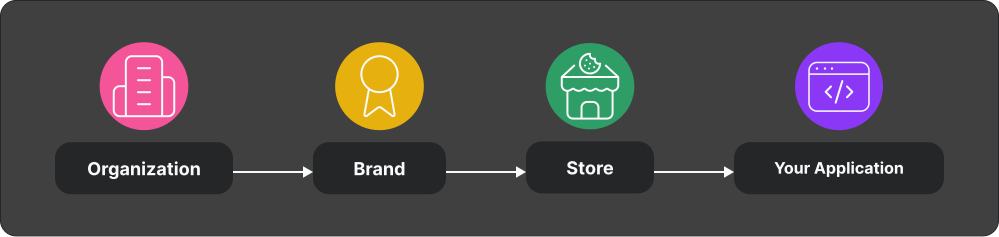
| Concept | Meaning |
|---|---|
| **Organization** | Merchant account |
| **Brand** | Concept or banner under the org |
| **Store** | One location — the unit most APIs and webhooks act on |
| **Connection** | Mapping between Otter’s store and an id in **your** system |
Full business model: [Otter 101](otter-101.md).
## Why pairing matters
Once a store is linked to your application:
- You send Otter’s store identity on store-scoped requests in the **`X-Store-Id`** header.
- Webhooks for that store carry store metadata so you can route events correctly.
If a store is **not** linked, store-scoped calls fail even with a valid bearer token. Pairing is separate from authentication — see [Authentication](guides-authentication.md).
## Ways to connect stores
Pick the path that matches how merchants come onto your product:
| Path | When to use | Start here |
|---|---|---|
| **Account Representative** | Manual / early onboarding; few stores | Ask your AR to link stores (also in [Quickstart](guides-quickstart.md#step-3-connect-your-stores)) |
| **Organization onboarding** | Merchant authorizes your app and you browse org → brand → store | [Onboard an organization](organization-integrations-onboarding-flow.md) |
Many products start with **Account Representative** for a few stores, then automate pairing at scale.
## Using `X-Store-Id`
On store-scoped resource calls:
```http title="Store-scoped request headers"
Authorization: Bearer
X-Store-Id:
```
- Use the Otter store id for the **linked** location (not an unlinked id from another app).
## Store status and removal
- Prefer [Organization onboarding](organization-integrations-onboarding-flow.md) for connection lifecycle when your product supports it.
- Treat certain **403** “account could not be found” responses as a fallback signal if a store link was removed.
## Related
- [Quickstart — connect stores](guides-quickstart.md#step-3-connect-your-stores)
- [Onboard an organization](organization-integrations-onboarding-flow.md)
- [Authentication](guides-authentication.md) — tokens and headers
- [Otter 101](otter-101.md)
## Next
Link at least one store ([Quickstart](guides-quickstart.md#step-3-connect-your-stores)), confirm a store-scoped call succeeds, then choose the Integrations hub for your product.
Webhook authentication
Webhook authentication — validate HMAC-SHA256 and Authorization on every Otter webhook.
webhook authentication
HMAC
X-HMAC-SHA256
# Keep webhooks secure
Webhook authentication means validating every Otter webhook before you trust the payload. This guide is the deep how-to for HMAC and `Authorization` options.
For the full auth picture (API tokens **and** webhooks), start with **[Authentication](guides-authentication.md)**. For REST vs webhooks, ack, and error callbacks, see **[Events and webhooks](guides-events-and-webhooks.md)**.
## Overview
Each webhook endpoint has a `secret` and an `Authentication Type`.
The `Authentication Type` controls the HTTP `Authorization` header Otter sends to your service. Choose one of: `HMAC SHA1` (legacy), `Basic Auth`, `Bearer Token`, or `None` (no `Authorization` header).
Independent of that choice, **every** request also includes an `X-HMAC-SHA256` header: the SHA-256 HMAC of the request body using your endpoint `secret`. Always validate that header.
## HMAC SHA256 signature
Every webhook request is signed with HMAC-SHA256. The signature is in the `X-HMAC-SHA256` header.
> Validate this signature on every request before you process the body.
>
> HMAC-SHA256 proves the request came from Otter and that the body was not altered. An attacker who only sees the hash can replay the same request, but cannot forge new payloads without the secret.
### Example of HTTP Headers (SHA256)
Headers from a request using the `Bearer Token` Authentication type.
Please, notice the `x-hmac-sha256` header, this example shows that you
will receive this header independent of the selected `Authentication Type`.
```txt title="Example webhook headers"
content-length: 298
x-hmac-sha256: PLZ05+ixPce3G/cKhiausM7ZGbmpISyzcnP0ivaPju4=
authorization: Bearer token123
content-type: application/json
```
### Computing and validating the hash (SHA256)
The HMAC SHA256 is computed using the following algorithm:
- Encode the request body and the secret to UTF-8
- Compute the HMAC SHA256 hash using previous values, this will give you a byte-array
- Encode the byte-array to base64 and decode the result to UTF-8
- The result will be a string with the base64 encoding of the HMAC SHA256 signature
You can always get the Webhook secret for your endpoint in the Otter Developer Portal.
To validate the hash:
- Compute the hash using the method above
- Extract the hash from the header `X-HMAC-SHA256`
- Compare both strings
Reference implementations:
### Hints
This [online tool](https://www.devglan.com/online-tools/hmac-sha256-online) is a good place to validate your implementation. Just ensure you select the output format as base64.
## Legacy Authentication: HMAC SHA1
The legacy authentication type is a HMAC SHA1 of the request body and the Webhook's secret. It sends in every request an HTTP Header with this format: `Authorization: MAC {HASH}`.
> SHA-1 is weak. Prefer validating `X-HMAC-SHA256` (and avoid relying on legacy HMAC SHA1 auth).
### Computing and validating the hash (SHA1)
To compute the hash you can use the same code from the HMAC SHA256, just change the algorithm to `hmac.sha1`.
To validate the request, extract the hash from the header `Authorization`. **IMPORTANT**:
Remember to remove the `MAC` prefix from the header and always strip your strings.
### Example of HTTP Headers (SHA1)
```txt title="Example legacy HMAC SHA1 headers"
x-hmac-sha256: TLUkvaPA7J+FWuQXDwcgnLa84WuHp526pCt4I6FgsXk=
authorization: MAC LblnjLxrJr40CDcM44+cvM/dYlk=
```
## Basic Auth
If you use this `Authentication Type`, you will need to provide a username and password in the endpoint configuration in the Otter Developer Portal. You can get more details about basic auth [here](https://swagger.io/docs/specification/authentication/basic-authentication/).
Webhooks with `Basic Auth` will have this HTTP Header: `Authorization: Basic base64({username}:{password})`.
> If an attacker intercepts Basic Auth credentials, they can forge requests with those credentials.
>
> Always validate `X-HMAC-SHA256` as well. Prefer not to rely on Basic Auth alone.
### Validating (Basic Auth)
- Extract the `Authorization` header value
- Remove the `Basic` prefix
- Decode the value using base64
- Split the string in the first `:`, the first value will be the username and the remaining the password
- Validate the username and password with value stored locally in your application
### Example of HTTP Headers (Basic Auth)
```txt title="Example Basic Auth headers"
x-hmac-sha256: TLUkvaPA7J+FWuQXDwcgnLa84WuHp526pCt4I6FgsXk=
authorization: Basic dGVzdGU6dGVzdGU=
```
### Bearer Token
Very similar to `Basic Auth` but uses a user defined token instead of username and password. You are free to use anything that makes sense for your application as a token, but a [JWT](https://jwt.io/) is a good approach.
> If an attacker intercepts a Bearer token, they can reuse it until you rotate it.
>
> Always validate `X-HMAC-SHA256` as well. Prefer not to rely on Bearer auth alone.
### Validating (Bearer Token)
- Extract the `Authorization` header value
- Remove the `Bearer` prefix
- Compare the token with your internal one
### Example of HTTP Headers (Bearer Token)
```txt title="Example Bearer Token headers"
x-hmac-sha256: TLUkvaPA7J+FWuQXDwcgnLa84WuHp526pCt4I6FgsXk=
authorization: Bearer this.is.a.token
```
Loyalty Manager
# Loyalty Manager
Enroll guests, compute rewards, and redeem or refund loyalty for orders.
## Overview
Loyalty Manager covers enrollment configuration, user CRUD, reward simulation, and redeem/accumulate/refund flows tied to orders.
## What you can call
| Capability | Purpose |
|---|---|
| Get enrollment config | Fields required to create a user |
| Create user | Enroll a loyalty member |
| Search users | Find users by search param |
| Get user | Read user profile |
| Compute applicable rewards | Rewards eligible for an order |
| Simulate rewards | Preview order after applying rewards |
| Redeem and accumulate rewards | Apply rewards on an order |
| Refund rewards | Reverse a reward transaction |
Endpoint and schema detail: [API reference](/docs/api-reference/reference/otter-api).
## Test
- Create a test user with enrollment config.
- Run simulate → redeem on a test order.
## Next
Contact your Account Representative if Loyalty Manager is not enabled for your application.
Menus
# Menus
Keep menus, hours, and item availability in sync when Otter pushes changes to your integrated service.
## Overview
Use this when Otter is the source of menu changes and your app applies them on a marketplace, POS, or other target. Otter sends webhook events; you perform the operation on the target and report results via callback endpoints.
## How it fits
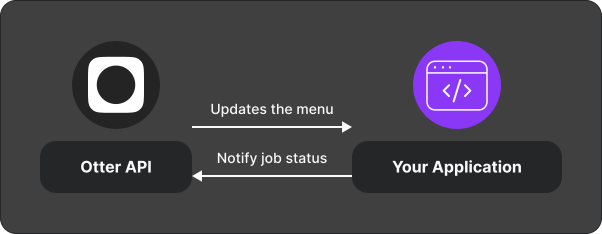
## Integration overview
1. Receive a menu-related webhook (publish, hours, availability, or send menu).
2. Apply the change on the integrated service.
3. POST the result to the matching callback endpoint — or [report a failure](menus-integrations-failed-event-flow.md).
| Flow | Webhook intent | Callback |
|---|---|---|
| [Publish a menu](menus-integrations-publish-flow.md) | [Menu Publish (`menus.menu_publish`)](/docs/api-reference/reference/menu-publish-webhook) | [`POST /v1/menus/publish`](/docs/api-reference/reference/menu-publish-callback) |
| [Upsert hours](menus-integrations-upsert-hours-flow.md) | [Menu upsert hours (`menus.upsert_hours`)](/docs/api-reference/reference/upsert-menu-hours-webhook) | [`POST /v1/menus/hours`](/docs/api-reference/reference/menu-upsert-hours) |
| [Update availability](menus-integrations-update-menu-entities-availability-flow.md) | [Update menu entities availabilities (`menus.update_menu_entities_availabilities`)](/docs/api-reference/reference/update-menu-entities-availabilities-webhook) | [`POST /v1/menus/entity/availability/bulk`](/docs/api-reference/reference/update-menu-entities-availabilities-callback) |
| Send menu | [Send menu (`menus.send_menu`)](/docs/api-reference/reference/send-menu-webhook) | [`POST /v1/menus/current`](/docs/api-reference/reference/menu-send-callback) |
## Test
- Register webhooks and [validate signatures](guides-webhook-authentication.md).
- Walk through [Publish a menu](menus-integrations-publish-flow.md) with a test store.
## Related
- [Menus Manager](menus-manager-integrations-operations.md) — when your app owns the menu catalog
- [API reference](/docs/api-reference/reference/otter-api)
## Next
Start with [Publish a menu](menus-integrations-publish-flow.md). Before go-live, confirm error reporting via [Handle failed events](menus-integrations-failed-event-flow.md).
Handle failed events
# Handle failed events
Tell Otter when you cannot complete a menu webhook operation so users see a clear error.
## Before you begin
- You received a menu webhook (publish, hours, availability, or send menu) and cannot complete it on the target
## Steps
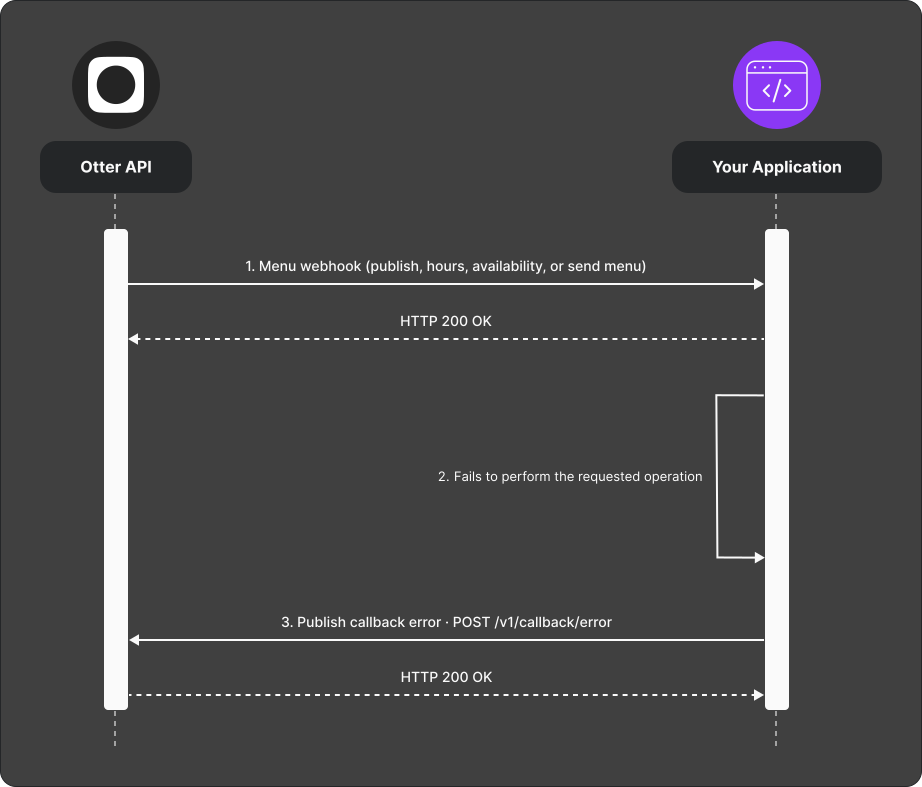
1. Otter sends a menu webhook requesting work on the integrated service.
2. Your app cannot complete the operation on the target.
3. Call [`POST /v1/callback/error`](/docs/api-reference/reference/publish-error) with the **event id** from the webhook and a **user-friendly** failure reason.
## Verify
Force a known failure (for example invalid entity id) and confirm Otter surfaces your message to the user.
## Common failures
| Symptom | Likely cause | Fix |
|---|---|---|
| Error not shown to user | Message too technical or missing event id | Use plain language; pass the webhook event id |
| Duplicate retries | Otter retries webhook | Make callback idempotent where possible |
## Next
- [Menus overview](menu-integrations-operations.md)
- [API reference — publish error](/docs/api-reference/reference/publish-error)
Publish a menu
# Publish a menu
Sync menus from Otter to your integrated service after Otter matches entities with what you already have on the target.
## Before you begin
- Webhooks registered and [signatures validated](guides-webhook-authentication.md)
- Store linked ([Quickstart](guides-quickstart.md#step-3-connect-your-stores))
- Callback endpoints implemented per [API reference](/docs/api-reference/reference/otter-api)
## Steps
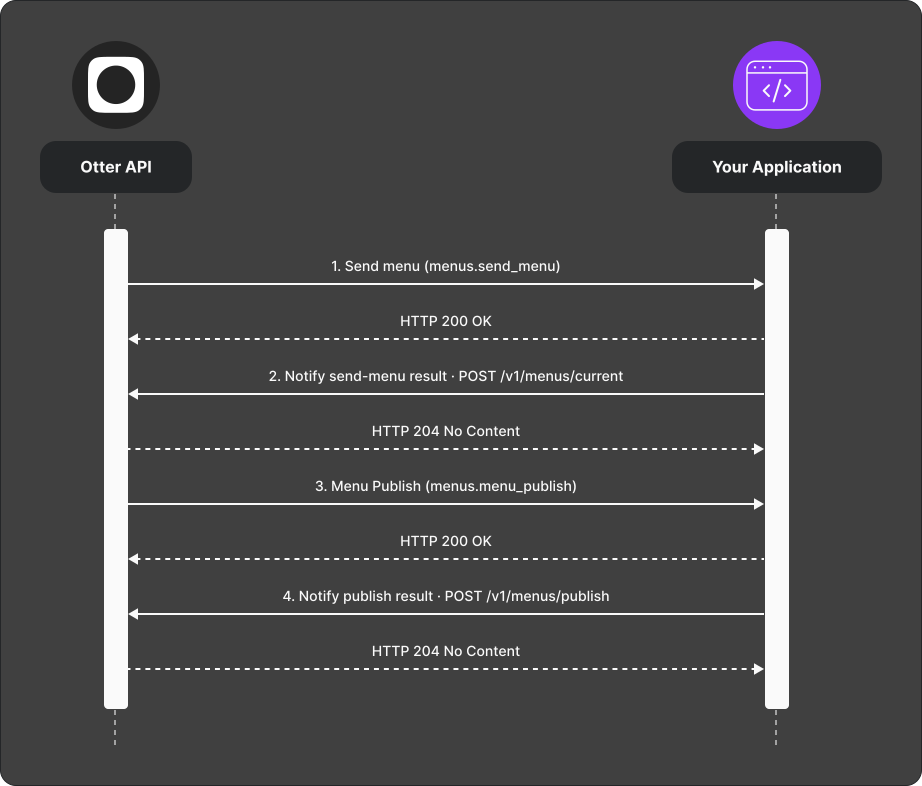
1. Otter sends a [Send menu (`menus.send_menu`)](/docs/api-reference/reference/send-menu-webhook) webhook — return the store’s current menus via [`POST /v1/menus/current`](/docs/api-reference/reference/menu-send-callback).
2. Otter matches entities to prior ids and sends a [Menu Publish (`menus.menu_publish`)](/docs/api-reference/reference/menu-publish-webhook) webhook with matched, new, and omitted (delete) entities.
3. Apply the publish on the target.
4. Send the callback with ids for newly created menu entities via [`POST /v1/menus/publish`](/docs/api-reference/reference/menu-publish-callback).
## Verify
After a full publish cycle, confirm menus on the target match Otter and new entity ids are returned in the callback.
## Common failures
| Symptom | Likely cause | Fix |
|---|---|---|
| Publish stalls | Missing send-menu response or wrong ids | Complete step 1; reuse stable ids from prior syncs |
| User sees opaque error | Callback error message not friendly | Use [Handle failed events](menus-integrations-failed-event-flow.md) with a clear message |
## Next
- [Upsert hours](menus-integrations-upsert-hours-flow.md)
- [Update availability](menus-integrations-update-menu-entities-availability-flow.md)
- [Menus overview](menu-integrations-operations.md)
Update availability
# Update availability
Suspend or unsuspend a menu item (or other entity) on your integrated service when Otter requests it.
## Before you begin
- [Menus overview](menu-integrations-operations.md) and webhook receiver ready
- Target service supports suspend/unsuspend for the entity type
## Steps
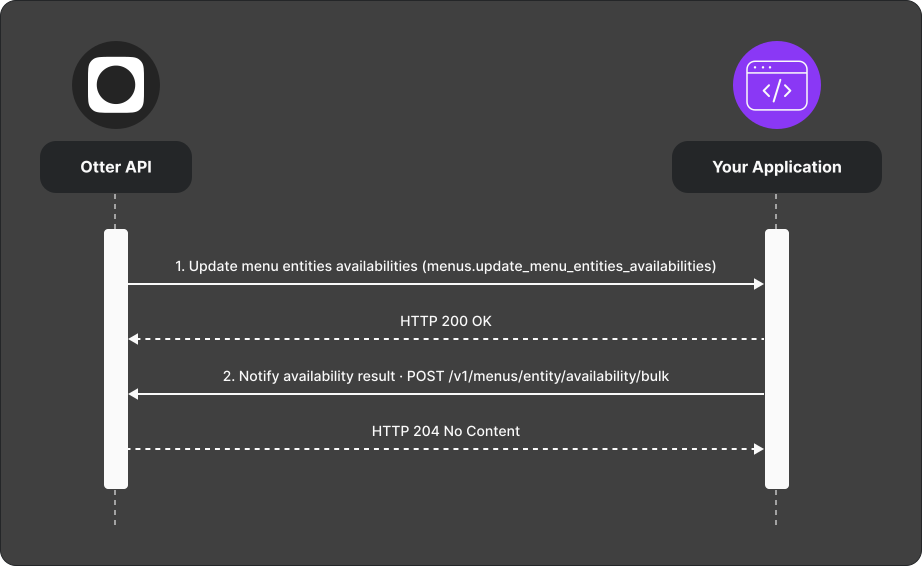
1. Otter sends an [Update menu entities availabilities (`menus.update_menu_entities_availabilities`)](/docs/api-reference/reference/update-menu-entities-availabilities-webhook) webhook.
2. Apply suspend or unsuspend on the integrated service.
3. POST the result to [`POST /v1/menus/entity/availability/bulk`](/docs/api-reference/reference/update-menu-entities-availabilities-callback).
## Verify
Trigger a suspend; confirm the item is unavailable on the target and the callback succeeds.
## Common failures
| Symptom | Likely cause | Fix |
|---|---|---|
| Callback rejected | Wrong entity id or store | Use ids from the webhook payload |
| Target unchanged | Operation failed on channel | [Report failure](menus-integrations-failed-event-flow.md) with a user-friendly message |
## Next
- [Publish a menu](menus-integrations-publish-flow.md)
- [Menus overview](menu-integrations-operations.md)
Upsert hours
# Upsert hours
Apply menu hour changes on your integrated service when Otter sends a [Menu upsert hours (`menus.upsert_hours`)](/docs/api-reference/reference/upsert-menu-hours-webhook) webhook.
## Before you begin
- [Menus overview](menu-integrations-operations.md)
- Webhook receiver and callback auth in place
## Steps
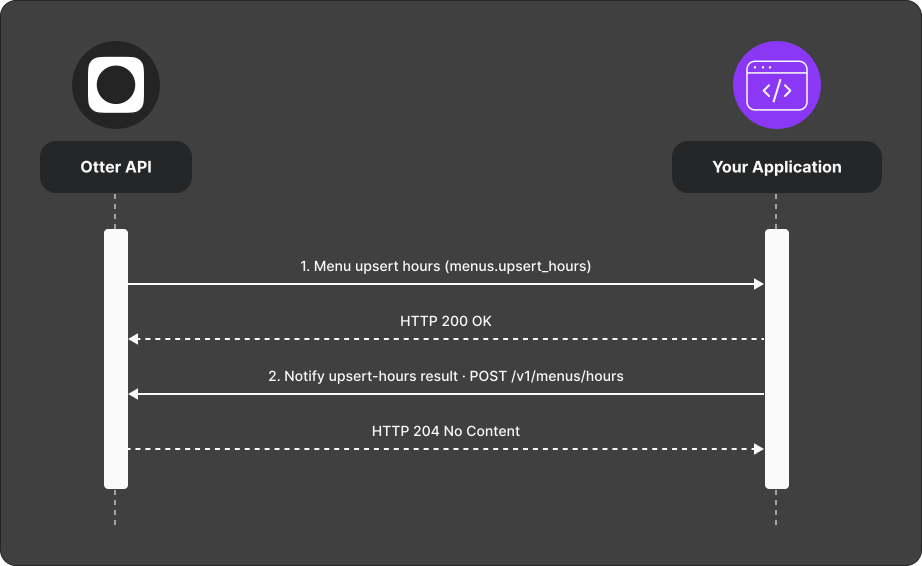
1. Otter sends a [Menu upsert hours (`menus.upsert_hours`)](/docs/api-reference/reference/upsert-menu-hours-webhook) webhook with the hours configuration for the store.
2. Update hours on the integrated service.
3. POST the result to [`POST /v1/menus/hours`](/docs/api-reference/reference/menu-upsert-hours).
## Verify
Change hours in Otter for a test store; confirm the target reflects the new schedule and the callback returns success.
## Common failures
| Symptom | Likely cause | Fix |
|---|---|---|
| Hours not applied | Target API error | Report via [Handle failed events](menus-integrations-failed-event-flow.md) |
| Partial day missing | Timezone or format mismatch | Align with [API reference](/docs/api-reference/reference/otter-api) payload |
## Next
- [Publish a menu](menus-integrations-publish-flow.md)
- [Menus overview](menu-integrations-operations.md)
Manager menu sync
# Manager menu sync
Synchronize Manager menus with Otter menus for a store, optionally publishing to OFO in the same request.
## Before you begin
- Menus Manager integration enabled for the store
## Steps
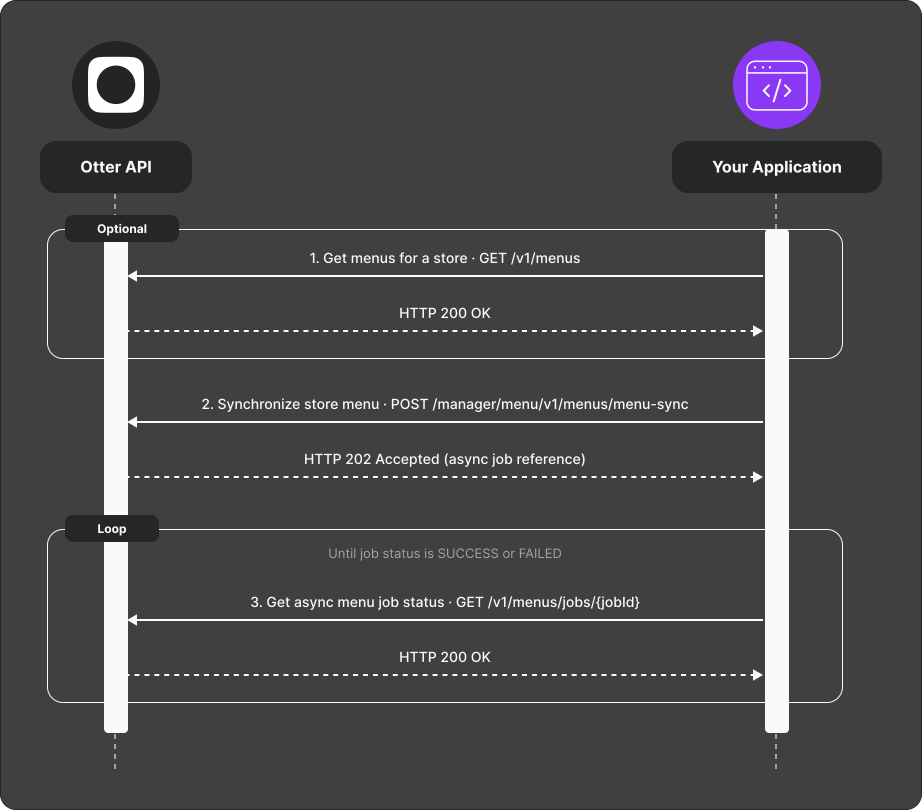
1. Trigger manager menu sync (optionally with publish to OFO).
2. Response includes a **job id** for the async work.
3. Poll [`GET /v1/menus/jobs/{jobId}`](/docs/api-reference/reference/get-async-job-status) until `SUCCESS` or `FAILED`.
## Verify
Run sync; job completes and Otter menus reflect Manager state (and OFO if you enabled publish).
## Next
- [Read and upsert menus](menus-manager-integrations-read-upsert-menus-flow.md)
- [Menus Manager overview](menus-manager-integrations-operations.md)
Menus Manager
# Menus Manager
Own the menu catalog in your app and sync menus with Otter, then publish to connected targets.
## Overview
Use Menus Manager when your integration is the **primary editor** of menus. You read and upsert menus via the API, track async jobs, publish to Otter-connected targets, and suspend or unsuspend entities.
## How it fits
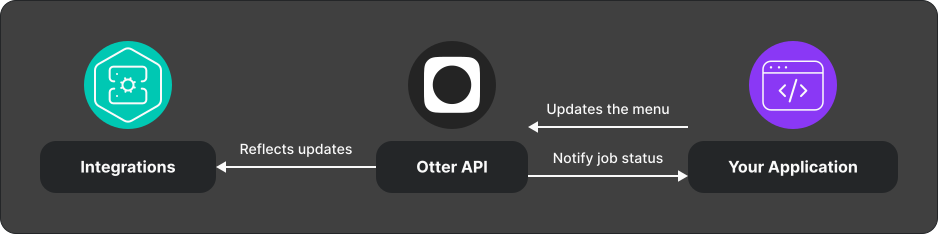
## Integration overview
1. [Read and replace menus](menus-manager-integrations-read-upsert-menus-flow.md) — send the complete desired menu snapshot; poll job status until `SUCCESS` or `FAILED`.
2. Optionally [publish to targets](menus-manager-integrations-publish-menus-to-target-flow.md).
3. [Suspend or unsuspend entities](menus-manager-integrations-suspend-unsupend-menu-entities-flow.md), then republish to targets.
4. Optionally [sync manager menus](menus-manager-integrations-manager-menu-sync-flow.md) with Otter menus and publish to OFO.
## What you can call
| Capability | Notes |
|---|---|
| Get menus for a store | List available menus |
| Replace menus | Returns `202` with a pending async job; omitted or unreachable customer-menu entities are deleted, so send the complete desired state |
| Get async menu job status | Poll [`GET /v1/menus/jobs/{jobId}`](/docs/api-reference/reference/get-async-job-status) |
| Get publish targets | List targets and last publish status per store |
| Publish menus to targets | Async publish job per target |
| Sync manager menus | Bulk sync + optional publish |
| Suspend / unsuspend entities | IDs must match upsert ids; republish to propagate |
Endpoint details: [API reference](/docs/api-reference/reference/otter-api).
## Test
- Replace a small test menu; poll until the job completes, then remove one entity
from the full payload and verify it is deleted.
- Publish to one test target and confirm status via publish-targets.
Every included item must carry its intended availability status. On legacy
menus, `FOR_SALE` clears an existing suspension and suspended statuses replace
the current suspension. Confirm equivalent behavior for template-enabled stores
during onboarding.
## Related
- [Menus (webhook-driven)](menu-integrations-operations.md)
- [API reference](/docs/api-reference/reference/otter-api)
## Next
Implement [Read and upsert menus](menus-manager-integrations-read-upsert-menus-flow.md), then wire publish and suspend flows before go-live.
Publish menus to a target
# Publish menus to a target
Push menus from Menus Manager to another integrated service Otter supports for the store.
## Before you begin
- At least one menu exists — see [Read and upsert menus](menus-manager-integrations-read-upsert-menus-flow.md)
- Publish targets configured for the store
## Steps
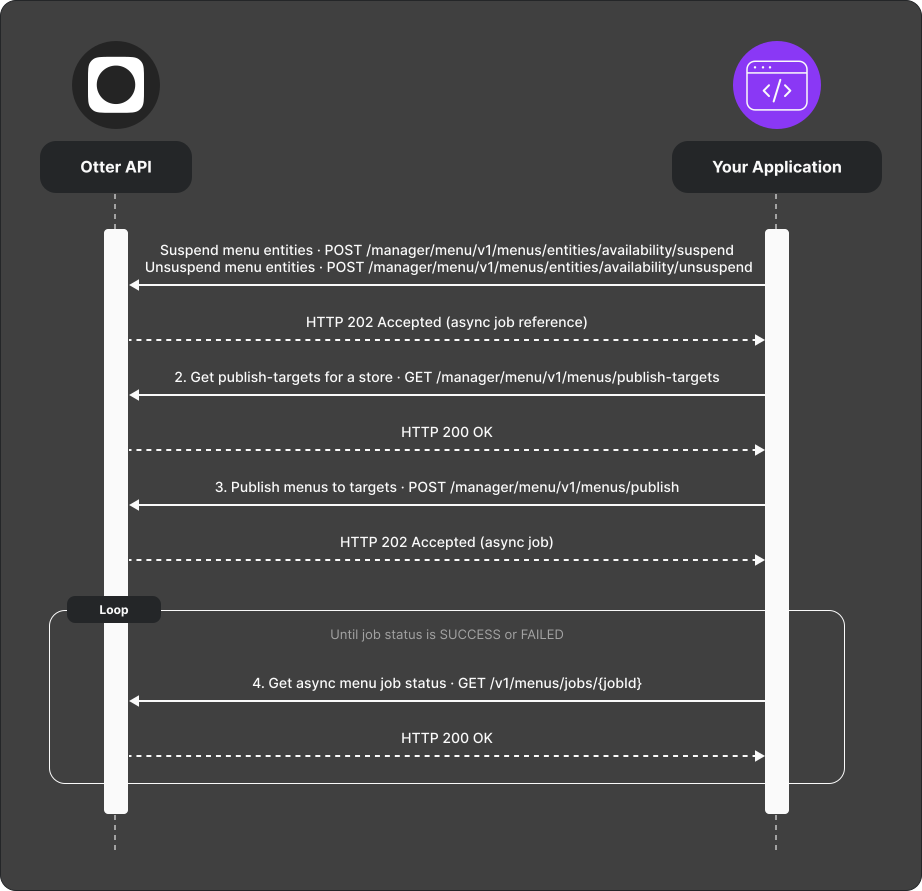
1. Fetch publish targets for the store (lists services and last publish status).
2. Call publish-to-targets with the target ids you want. Response includes a **job id**.
3. Poll async job status until `SUCCESS` or `FAILED`.
## Verify
Publish to one test target; confirm target menus match and job ends in `SUCCESS`.
## Common failures
| Symptom | Likely cause | Fix |
|---|---|---|
| No targets returned | Store not linked to target integration | Check store pairing |
| Publish `FAILED` | Target rejected menu shape | Inspect job error; fix upsert payload |
## Next
- [Suspend or unsuspend entities](menus-manager-integrations-suspend-unsupend-menu-entities-flow.md)
- [Menus Manager overview](menus-manager-integrations-operations.md)
Read, send, and upsert menus
# Read, send, and upsert menus
Read menus stored in Otter, replace a store's complete menu snapshot, return the
current menu when Otter requests it, and track asynchronous menu jobs to
completion.
> [`POST /v1/menus`](/docs/api-reference/reference/upsert-menu) replaces the complete
> menu snapshot. It is not a partial update. Include every entity that should
> remain.
## Before you begin
- Application credentials and store linked
- Stable ids for categories, items, and modifiers (your system ids — Otter reuses them)
- A webhook endpoint configured for menu events
## Steps
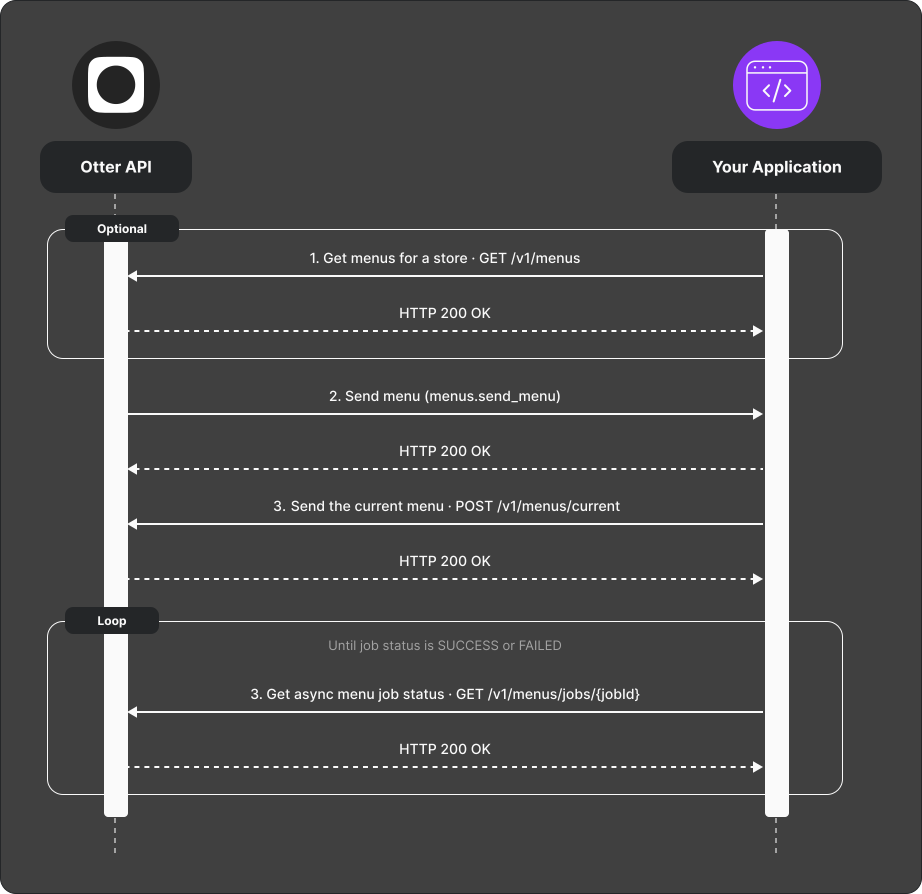
### Replace the complete menu
1. Optionally read all menus for the store with
[`GET /v1/menus`](/docs/api-reference/reference/get-menu).
2. Build the complete desired menu state. Customer-menu entities omitted from
the relationship graph are deleted. Entries present only in top-level maps
but unreachable from menus, categories, or items are not processed.
3. Replace the menu with [`POST /v1/menus`](/docs/api-reference/reference/upsert-menu).
The `202 Accepted` response includes a pending **job id**. It confirms
workflow submission, not that menus or photos were persisted.
4. Poll
[`GET /v1/menus/jobs/{jobId}`](/docs/api-reference/reference/get-async-job-status)
until status is `SUCCESS` or `FAILED`.
For overnight hours, set the end time earlier than the start time on the day
service begins. For example, Monday `20:00` to `02:00` means Monday evening
through Tuesday at 02:00. Do not split it into two API intervals.
### Return the current menu when requested
1. Receive the
[Send menu (`menus.send_menu`)](/docs/api-reference/reference/send-menu-webhook)
webhook and acknowledge it with a `2xx` response.
2. Return the store's current menu through
[`POST /v1/menus/current`](/docs/api-reference/reference/menu-send-callback).
Send the webhook's event ID in the `X-Event-Id` header.
3. Poll
[`GET /v1/menus/jobs/{jobId}`](/docs/api-reference/reference/get-async-job-status)
for the associated menu job until its status is `SUCCESS` or `FAILED`.
## Verify
1. Upsert a test menu and wait for `SUCCESS`.
2. Send the same complete payload again and verify the resulting menu is
unchanged. Each submission still creates a new workflow; this is not an
idempotency guarantee.
3. Remove one customer item from the complete payload, upsert again, and verify
that item is deleted.
4. Trigger a Send menu event. Confirm that your webhook and menu callback return
successful `2xx` responses, then verify that the associated menu job reaches
`SUCCESS`.
## Common failures
| Symptom | Likely cause | Fix |
|---|---|---|
| Send menu event not received | Webhook destination is not configured for the event | Check the webhook configuration for your app |
| Callback returns `400` or `404` | Missing or incorrect store or event ID | Use the store ID and top-level event ID from the webhook |
| Callback returns `422` | Menu payload does not match the expected schema | Compare the payload with the [menu send callback](/docs/api-reference/reference/menu-send-callback) |
| Job remains `PENDING` | The menu is still being processed or the service is backlogged | Continue polling with backoff and check [rate limits](guides-rate-limiting.md) |
| Job reaches `FAILED` | The asynchronous menu operation could not be completed | Inspect the job error and correct the menu data before retrying |
| Existing entities disappear | The replacement payload omitted them | Read the current menu, merge intended changes, and send the complete desired state |
| Ambiguous response after submission | The workflow may already have started | Inspect the menu and job status before resubmitting |
Inbound menu and photo limits are not represented by the publish-target
capabilities in the Integration Registry. Confirm applicable payload, entity,
photo, and template-menu restrictions during onboarding.
## Next
- [Publish menus to a target](menus-manager-integrations-publish-menus-to-target-flow.md)
- [Menus Manager overview](menus-manager-integrations-operations.md)
Suspend or unsuspend entities
# Suspend or unsuspend entities
Change availability of categories, items, or modifiers in Otter, then push changes to publish targets.
## Before you begin
- Menus created with consistent entity ids ([Read and upsert menus](menus-manager-integrations-read-upsert-menus-flow.md))
## Steps

1. Call [`/manager/menu/v1/menus/entities/availability/suspend`](/docs/api-reference/reference/manager-suspend-menu-entities) or `.../unsuspend` with the same ids you used when upserting menus.
2. Run [Publish menus to a target](menus-manager-integrations-publish-menus-to-target-flow.md) so connected services pick up the change.
## Verify
Suspend one item; after publish, confirm it is unavailable on the target.
## Next
- [Menus Manager overview](menus-manager-integrations-operations.md)
Register your application
# Register your application
This step is part of the **[Quickstart](guides-quickstart.md#step-1-register-your-application)**.
Follow the Quickstart for the full path: credentials → first API call → connect stores → webhooks.
Connect your stores
# Connect your stores
This step is part of the **[Quickstart](guides-quickstart.md#step-3-connect-your-stores)**.
Follow the Quickstart for the full path: credentials → first API call → connect stores → webhooks.
Register webhooks
# Register webhooks
This step is part of the **[Quickstart](guides-quickstart.md#step-4-register-webhooks-and-verify-signatures)**.
Also read **[Keep webhooks secure](guides-webhook-authentication.md)** before go-live.
Orders (receive into your system)
# Orders (receive into your system)
Use this when Otter (or another connected channel) creates orders and your system — for example a POS — needs to ingest them and stay in sync on status.
## Overview
Otter sends webhook events when an order is created and when its status changes. Your app receives those events, creates or updates the order locally, and keeps prep state aligned. Payload shapes live in the [API reference](/docs/api-reference/reference/otter-api).
## How it fits
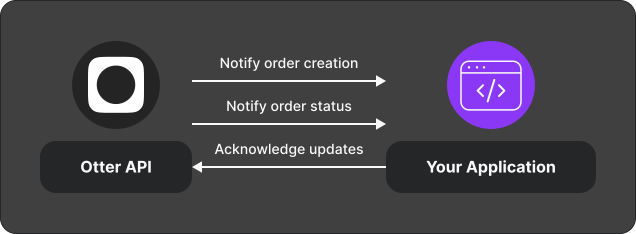
## Integration overview
1. Register a webhook URL and [validate signatures](guides-webhook-authentication.md).
2. Handle the order create event — see [Handle create events](orders-integrations-create-event-flow.md).
3. Handle status notification events — see [Handle status notifications](order-status-notifications.md).
## Events you receive
| Event | Meaning |
|---|---|
| [Orders creation (`orders.new_order`)](/docs/api-reference/reference/order-create-webhook) | A new order exists in Otter; payload includes the order |
| [Order status update (`orders.order_status_update`)](/docs/api-reference/reference/order-status-update-webhook) | Status changed; keep your system in sync |
## Test
- Point a webhook at your receiver.
- Create a test order through Otter (or ask your Account Representative for a fixture path).
- Confirm create + status events arrive and pass signature checks.
## Related
- [Handle create events](orders-integrations-create-event-flow.md)
- [Handle status notifications](order-status-notifications.md)
- [Keep webhooks secure](guides-webhook-authentication.md)
- [API reference](/docs/api-reference/reference/otter-api)
## Next
Wire create and status handlers, then confirm your status mapping matches kitchen workflow before go-live.
Orders (send into Otter)
# Orders (send into Otter)
Use this when your system is the source of truth for orders — for example a marketplace or channel that pushes orders into Otter for kitchen prep.
## Overview
Your app creates orders and updates status as prep and handoff progress. Otter notifies you when the restaurant accepts, marks ready, hands off, or wants to cancel. Exact request and response shapes live in the [API reference](/docs/api-reference/reference/otter-api).
## How it fits
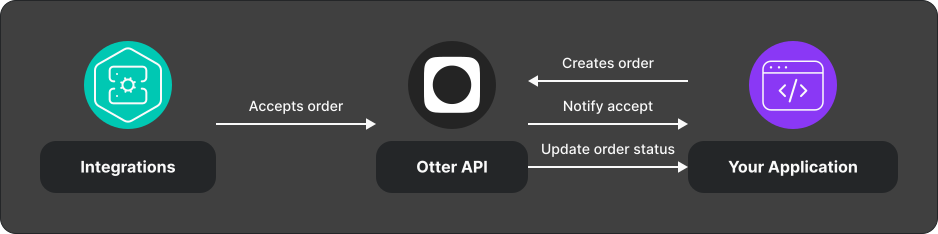
## Integration overview
1. Create an order with [`POST /v1/orders`](/docs/api-reference/reference/create-order) — see [Create an order](orders-integrations-creation-flow.md).
2. Handle status webhooks ([Order status update (`orders.order_status_update`)](/docs/api-reference/reference/order-status-update-webhook), optional [Order ready notification (`orders.order_ready`)](/docs/api-reference/reference/order-ready) / handed-off) — see [Order lifecycle](orders-integrations-lifecycle.md).
3. Update status to `PREPARED` / `FULFILLED` (and `CANCELED` when needed) with [`POST /v1/orders/{orderId}/status`](/docs/api-reference/reference/update-order-status). Here, `{orderId}` is the external order id your app supplied at creation. A `202 Accepted` response means the update was queued, not that the downstream transition completed.
4. Optionally update delivery info or line items when your product supports it (see below and the API reference).
5. Handle intent-to-cancel events by confirming cancel via the status endpoint.
## What you can call
| Capability | Method / path | Notes |
|---|---|---|
| Create order | [`POST /v1/orders`](/docs/api-reference/reference/create-order) | Store-scoped |
| Update status | [`POST /v1/orders/{orderId}/status`](/docs/api-reference/reference/update-order-status) | `PREPARED`, `CANCELED`, `FULFILLED` |
| Update delivery | [`PUT /v1/orders/{orderId}/delivery`](/docs/api-reference/reference/update-order-delivery-info) | Address, courier, location, notes |
| Update customer items | [`PUT /manager/order/v1/sources/{source}/orders/{orderId}/items`](/docs/api-reference/reference/manager-update-order-customer-items) | Scope `manager.orders`; dine-in / open-tab / d2c-eater-website only — see API reference |
| Close dine-in tab | [`POST /manager/order/v1/sources/{source}/orders/{orderId}/close`](/docs/api-reference/reference/mark-dine-in-order-closed) | Scope `manager.orders` |
## Events you receive
| Event | Meaning |
|---|---|
| Intent to cancel | Restaurant wants to cancel; confirm with status `CANCELED` and the matching `X-Event-Id` if cancellation succeeds. The API has no decline callback state. |
| Order status update | Status events such as `ORDER_ACCEPTED`, `ORDER_READY_TO_PICKUP`, `ORDER_HANDED_OFF`, and `ORDER_FULFILLED` (payload includes status history with timestamps). Rejected and canceled status events are not exposed. |
## Test
- Use application credentials and a linked test store ([Quickstart](guides-quickstart.md)).
- Register a webhook URL and [validate signatures](guides-webhook-authentication.md).
- Create a low-risk test order, walk accept → prepared → fulfilled, and confirm webhook delivery.
- Repeat the create request with the same external order id; confirm the API
returns `409 Conflict` and only one order exists.
## Related
- [Order lifecycle](orders-integrations-lifecycle.md)
- [Create an order](orders-integrations-creation-flow.md)
- [Cancel an order](orders-integrations-cancellation-flow.md)
- [Migrate to Order Total v2](orders-integrations-creation-order-total-v2.md)
- [API reference](/docs/api-reference/reference/otter-api)
## Next
Before go-live: confirm status mapping with the restaurant workflow, webhook signature checks, and [rate limits](guides-rate-limiting.md).
### Customer item modifications (advanced)
Updating customer items ([`PUT /manager/order/v1/sources/{source}/orders/{orderId}/items`](/docs/api-reference/reference/manager-update-order-customer-items)) is supported only for the **d2c-eater-website** integration, **dine-in** orders, and when the **order tab is open**. Otherwise the API returns **409**; missing orders return **404**. Success returns **202 Accepted**. Requires scope `manager.orders`.
Each entry in `customerItemModifications` must set exactly one of: `quantityUpdated`, `priceAdjusted`, or `itemAdded`. See the API reference for field rules. Summary:
- **itemAdded** — Add a new line (new item or same item with different modifiers as a new line). Modifiers go on `addedItem.modifiers`.
- **quantityUpdated** — Change quantity of an existing line (including `0` to remove). Send `customerItemIds`, `quantity`, and `oldQuantity`.
- **priceAdjusted** — Order-level subtotal adjustment via `delta` (positive = upcharge, negative = refund).
Handle status notifications
# Handle status notifications
Receive optional webhooks when an order reaches Ready, HandedOff, or Fulfilled (Order Manager integrations).
## Before you begin
- Order Manager integration with notifications enabled in registry
- Webhook receiver configured
## Steps
When configured for your integration, Otter sends:
| Status | Webhook (when enabled) |
|---|---|
| Ready | [Order ready notification (`orders.order_ready`)](/docs/api-reference/reference/order-ready) |
| HandedOff | [Order handed off notification (`orders.order_handed_off`)](/docs/api-reference/reference/order-handed-off) |
| Fulfilled | [Order fulfilled notification (`orders.order_fulfilled`)](/docs/api-reference/reference/order-fulfilled) |
Handle each event in your POS or ops UI to match kitchen / handoff workflow.
## Verify
Advance a test order through ready → handed off → fulfilled; confirm only configured notifications fire.
## Next
- [Handle create events](orders-integrations-create-event-flow.md)
- [Orders (receive) overview](order-consumer-integrations-operations.md)
Cancel an order
# Cancel an order
Cancel an order before it is fulfilled — either from your app or after a restaurant intent-to-cancel.
## Before you begin
- Order already created in Otter ([Create an order](orders-integrations-creation-flow.md))
- Status updates allowed for your app ([`POST /v1/orders/{orderId}/status`](/docs/api-reference/reference/update-order-status))
- Webhooks registered if you need intent-to-cancel events
## Steps
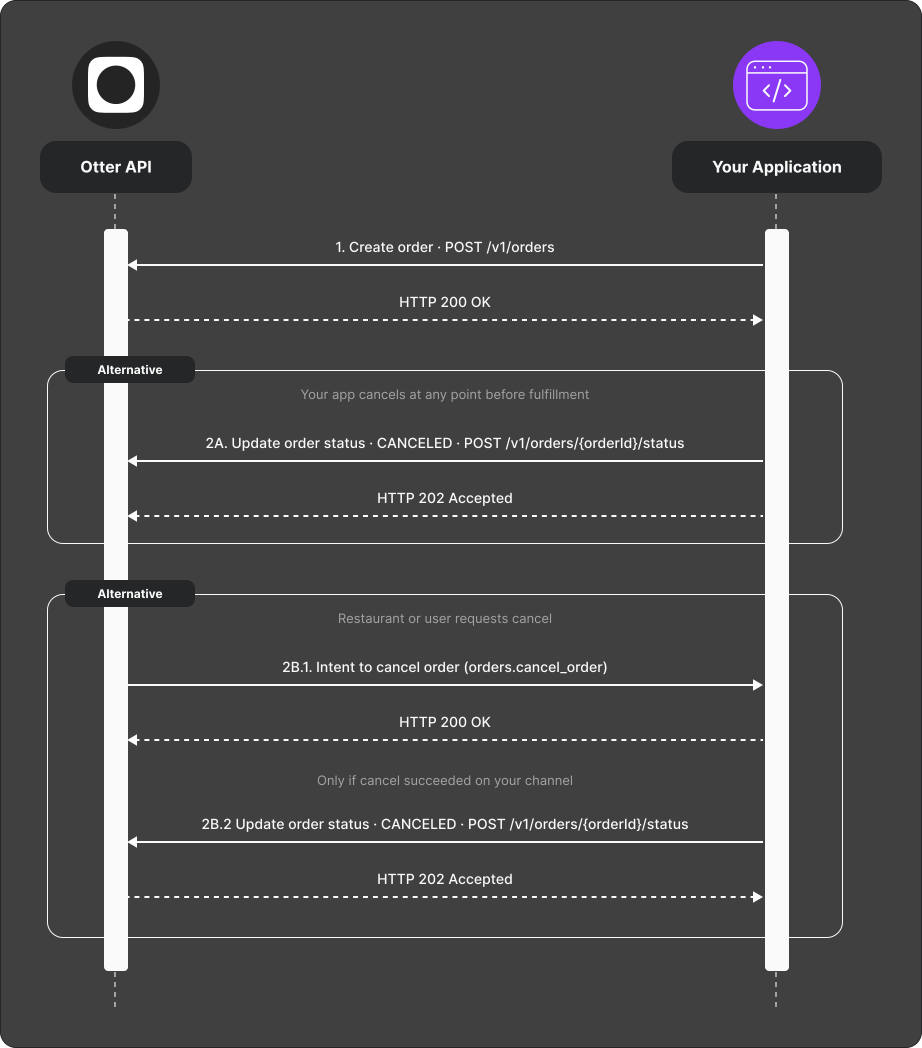
1. Create the order with [`POST /v1/orders`](/docs/api-reference/reference/create-order) (same as the create flow).
2. **Cancel from your app (path A):** After cancellation succeeds in your system, set status to `CANCELED` with [`POST /v1/orders/{orderId}/status`](/docs/api-reference/reference/update-order-status).
3. **Restaurant-initiated (path B):**
1. Otter sends an [Intent to cancel order (`orders.cancel_order`)](/docs/api-reference/reference/intent-to-cancel-order-webhook) webhook when a restaurant operator requests cancel.
2. If your channel requires it, attempt cancel on the online delivery / marketplace side.
3. When cancel succeeds, set status to `CANCELED` with [`POST /v1/orders/{orderId}/status`](/docs/api-reference/reference/update-order-status) and echo the webhook's event ID in `X-Event-Id`.
The cancellation callback contract has no decline state and no public
no-response deadline. If cancellation fails, do not acknowledge it as
`CANCELED`; follow the integration-specific reconciliation process agreed
during onboarding.
## Verify
Cancel a test order both ways (your app and, if available, restaurant intent).
Confirm that the status endpoint returns `202 Accepted` and that the eventual
order state matches. A `202` response confirms queueing only; it is not a
downstream completion acknowledgment.
## Common failures
| Symptom | Likely cause | Fix |
|---|---|---|
| Intent webhook received but order still open | Forgot status update after channel cancel | Call status endpoint with `CANCELED` |
| Status update returns `404` | Wrong or unknown external order id | Use the same `externalIdentifiers.id` supplied when the order was created |
| Status update returns `202`, but state has not changed yet | The update is still queued or downstream processing failed | Reconcile the order through the integration-specific process |
## Next
- [Order lifecycle](orders-integrations-lifecycle.md)
- [Orders overview (send into Otter)](order-provider-integrations-operations.md)
Handle create events
# Handle create events
Ingest orders Otter created internally (integrations or manual entry) into your POS or back office.
## Before you begin
- Webhook receiver for [Orders creation (`orders.new_order`)](/docs/api-reference/reference/order-create-webhook) events
- [Keep webhooks secure](guides-webhook-authentication.md)
- Async processing path if you cannot finish within the webhook timeout
## Steps
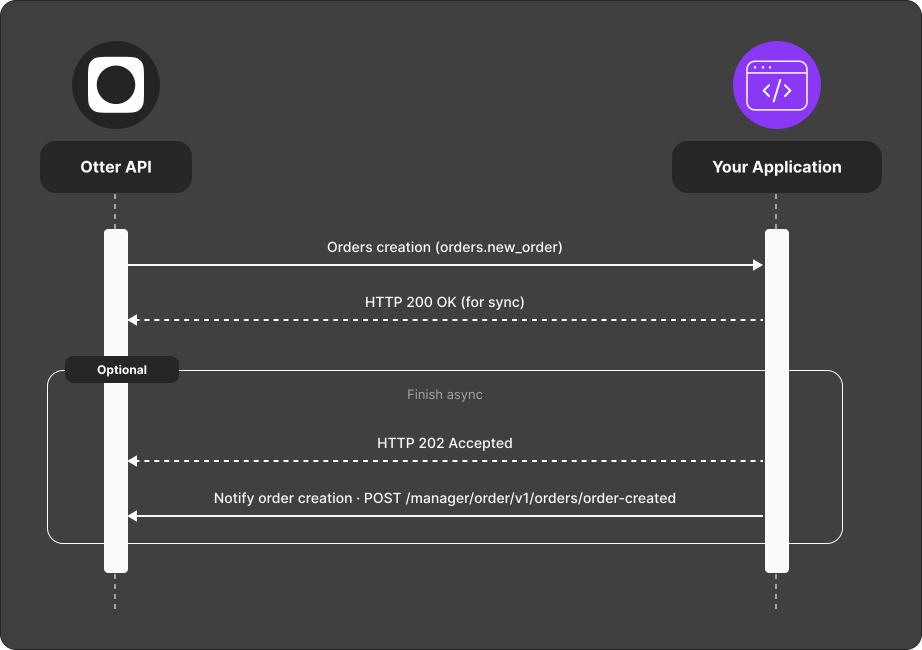
1. Otter sends an [Orders creation (`orders.new_order`)](/docs/api-reference/reference/order-create-webhook) webhook with the order payload.
2. Respond with:
- **HTTP 200** — processed synchronously, or
- **HTTP 202** — accepted for async processing; when finished, acknowledge with [`POST /manager/order/v1/orders/order-created`](/docs/api-reference/reference/order-created) (scope `manager.orders`), sending the original webhook’s `X-Event-Id`.
3. On failure, report via [`POST /v1/callback/error`](/docs/api-reference/reference/publish-error).
## Verify
Trigger a create event; your system shows the order and Otter receives 200/202 as appropriate.
## Next
- [Handle status notifications](order-status-notifications.md)
- [Orders (receive) overview](order-consumer-integrations-operations.md)
Create an order
# Create an order
Push a new order into Otter and follow status through fulfillment.
## Before you begin
- Application credentials ([Quickstart](guides-quickstart.md#step-1-register-your-application))
- Store linked and `X-Store-Id` ready ([Quickstart](guides-quickstart.md#step-3-connect-your-stores))
- Webhook URL registered for order status events ([Quickstart](guides-quickstart.md#step-4-register-webhooks-and-verify-signatures))
- Signature validation implemented ([Keep webhooks secure](guides-webhook-authentication.md))
## Steps
1. Create the order with [`POST /v1/orders`](/docs/api-reference/reference/create-order) (see [API reference](/docs/api-reference/reference/otter-api) for the body). Include `X-Store-Id` and a stable `externalIdentifiers.id`.
2. When the restaurant accepts (or integration-specific automation accepts), Otter sends an order status webhook with `ORDER_ACCEPTED`. Otter API integrations have no universal acceptance or automatic-rejection deadline; confirm any configured window during onboarding.
3. (Optional) When the order is ready for pickup, Otter sends a status webhook with `ORDER_READY_TO_PICKUP`.
4. Update the order to `PREPARED` with [`POST /v1/orders/{orderId}/status`](/docs/api-reference/reference/update-order-status) when your side marks prep complete (if your flow requires it).
5. (Optional) When the order is handed off, Otter may send `ORDER_HANDED_OFF`.
6. Update the order to `FULFILLED` with [`POST /v1/orders/{orderId}/status`](/docs/api-reference/reference/update-order-status) when the order is complete on your side.
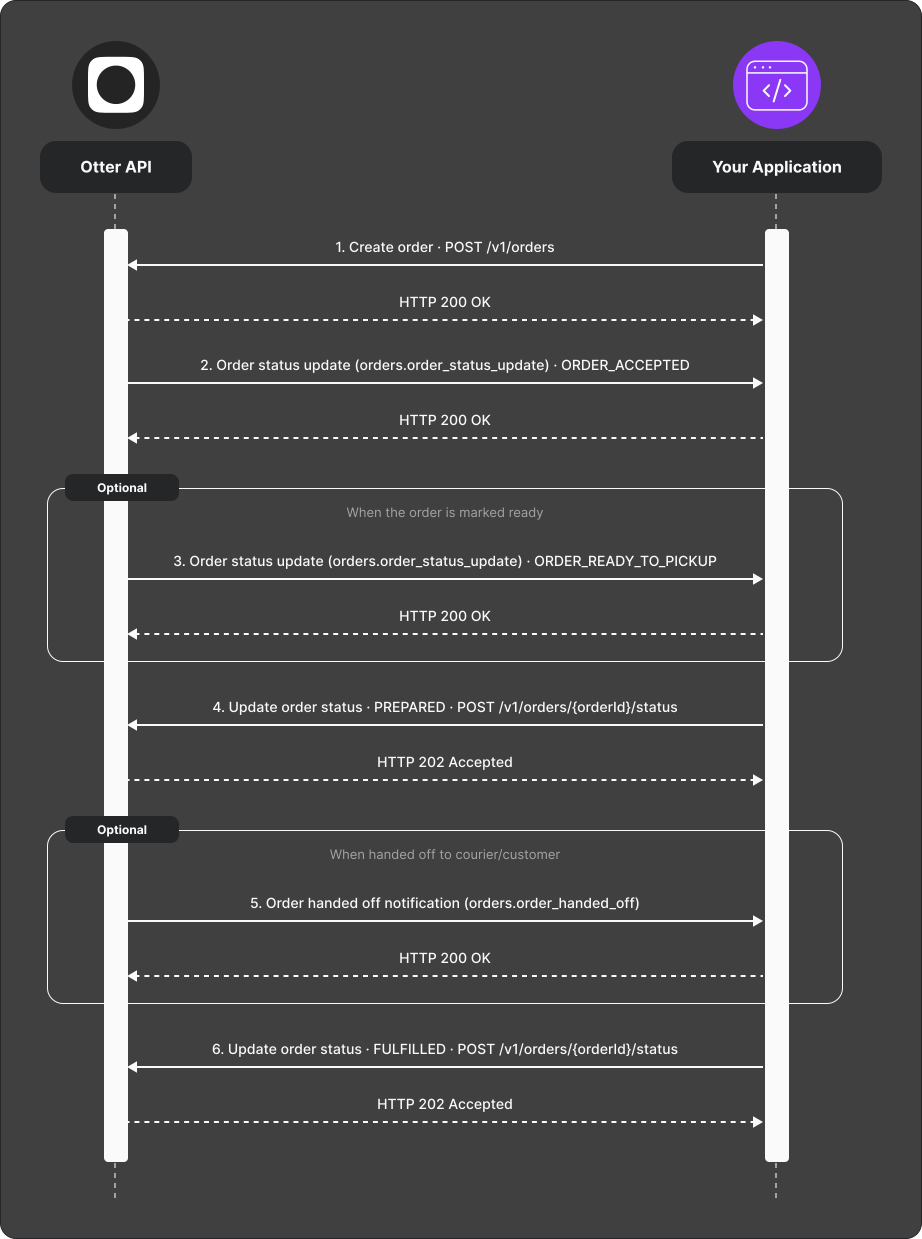
## Verify
Create a test order and confirm:
- [`POST /v1/orders`](/docs/api-reference/reference/create-order) returns success and an order id
- Repeating the request with the same `externalIdentifiers.id` returns
`409 Conflict` and does not create a duplicate order
- You receive `ORDER_ACCEPTED` (or equivalent) on your webhook with a valid `X-HMAC-SHA256`
- Status updates to `PREPARED` / `FULFILLED` return `202 Accepted` for that
order id. This confirms that the update was queued, not that downstream
processing completed.
## Common failures
| Symptom | Likely cause | Fix |
|---|---|---|
| Create fails with store errors | Missing/wrong `X-Store-Id` or store not linked | Re-check store onboarding |
| Retry returns `409 Conflict` | That external order id already exists | Treat the original create as the business action; reconcile using your stored external id |
| No status webhooks | Webhook not registered or URL unreachable | Fix registration; check URL |
| Signature check fails | Wrong secret or body bytes | Use raw body + endpoint secret |
## Next
- [Order lifecycle](orders-integrations-lifecycle.md)
- [Cancel an order](orders-integrations-cancellation-flow.md)
- [Orders overview](order-provider-integrations-operations.md)
Migrate to Order Total v2
# Migrate to Order Total v2
Move from deprecated `orderTotal` to `orderTotalV2` for clearer financial breakdown on orders.
## Overview
`OrderTotal` is being replaced by `OrderTotalV2`, which separates customer totals, payments, service provider charges, and payout with composable breakdown lines.
## Before you begin
- You currently send `orderTotal` on order create or update
- Ability to validate payloads with a test store
## Guidelines
- Send at least one of `orderTotal` or `orderTotalV2`. Both are accepted during
migration; when both are present, `orderTotalV2` takes precedence. Prefer V2
alone for new work.
- Prefer separate `VALUE` and `TAX` lines instead of `VALUE_WITH_TAX` when you know the split. Use `VALUE_WITH_TAX` only when the breakdown is unknown.
- Do not send duplicate values. Customer total is the sum of `customerTotal` fields except those marked as `VAT`.
### `orderTotalV2` structure (summary)
- **`customerTotal`** — food sales, fees, tips, etc., with optional nested breakdown (e.g. `foodSales.breakdown` with `subType` `VALUE` / `VAT`).
- **`customerPayment`** — payment and prepayment detail.
- **`serviceProviderCharge`** — provider charge breakdown.
- **`payout`** — payout breakdown.
Full field definitions: [API reference](/docs/api-reference/reference/otter-api).
## Steps
1. Map existing `orderTotal` fields to `orderTotalV2` breakdown lines.
2. Send test orders with `orderTotalV2` only.
3. Validate totals match your legacy payloads.
4. Roll out per your release process.
## Verify
Compare order financials in Otter with your source system for several order types (tax-inclusive, discounts, adjustments).
## Next
- [Create an order](orders-integrations-creation-flow.md)
- [Orders (send) overview](order-provider-integrations-operations.md)
Order lifecycle
# Order lifecycle
Understand the statuses an order moves through from create to fulfilled or canceled.
## Overview
Orders start in `NEW_ORDER` (or a later status if your side already progressed). They move through accept → ready → fulfilled, or can be updated to `CANCELED`. Your app drives some updates with the status API; Otter notifies you of selected milestones via webhooks.
## How it fits
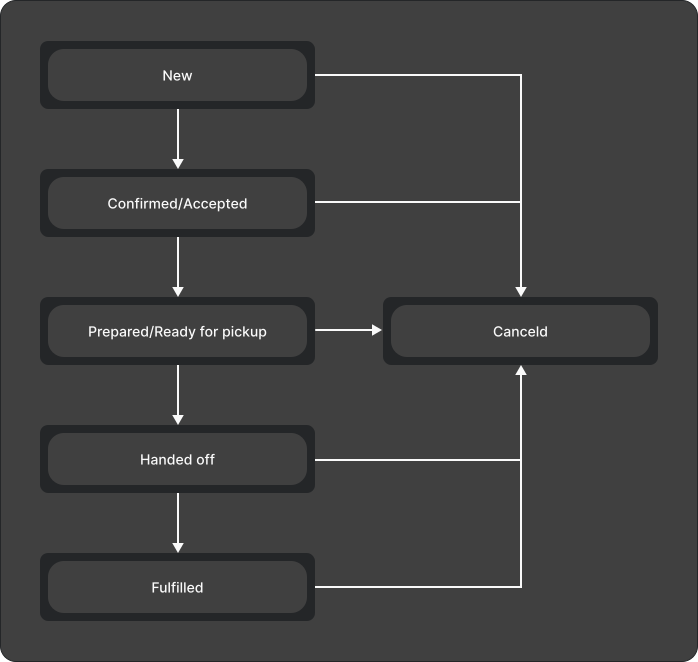
## Integration overview
1. Order is created in `NEW_ORDER` (or an advanced status if prep already started on your side).
2. Restaurant accepts (manually or automatically) → `ORDER_ACCEPTED`.
3. Prep completes → `ORDER_READY_TO_PICKUP`.
4. Customer receives the order → `ORDER_FULFILLED` (terminal success).
5. When cancellation succeeds on your side, submit `CANCELED`.
## Events and API updates
| Transition | Typical driver |
|---|---|
| → `ORDER_ACCEPTED` | Restaurant / Otter; [Order status update (`orders.order_status_update`)](/docs/api-reference/reference/order-status-update-webhook) |
| → `ORDER_READY_TO_PICKUP` | Restaurant / Otter; [Order ready notification (`orders.order_ready`)](/docs/api-reference/reference/order-ready) when enabled |
| Your app → `PREPARED` / `FULFILLED` / `CANCELED` | [`POST /v1/orders/{orderId}/status`](/docs/api-reference/reference/update-order-status); `202 Accepted` means queued |
| → `ORDER_FULFILLED` | Outbound fulfilled status event |
Exact enum names and payloads: [API reference](/docs/api-reference/reference/otter-api).
The status endpoint verifies that the order exists and queues the requested
update. It does not synchronously enforce or confirm a public lifecycle
transition graph. Status webhooks do not expose rejected or canceled events.
## Related
- [Create an order](orders-integrations-creation-flow.md)
- [Cancel an order](orders-integrations-cancellation-flow.md)
- [Orders overview (send into Otter)](order-provider-integrations-operations.md)
## Next
Implement [Create an order](orders-integrations-creation-flow.md), then wire status webhooks with [signature validation](guides-webhook-authentication.md).
Onboard an organization
# Onboard an organization
Let merchants authorize your app and connect stores using OAuth and the organization API.
## Overview
Store onboarding requires the store owner to authorize your application (OAuth Authorization Code flow). You browse organization → brand → store hierarchy, then create a **connection** that maps Otter’s store to your `storeId`.
## Before you begin
- OAuth client configured for your application
- User can sign in and grant access
- You know the `storeId` your system uses for each location
## Organization structure
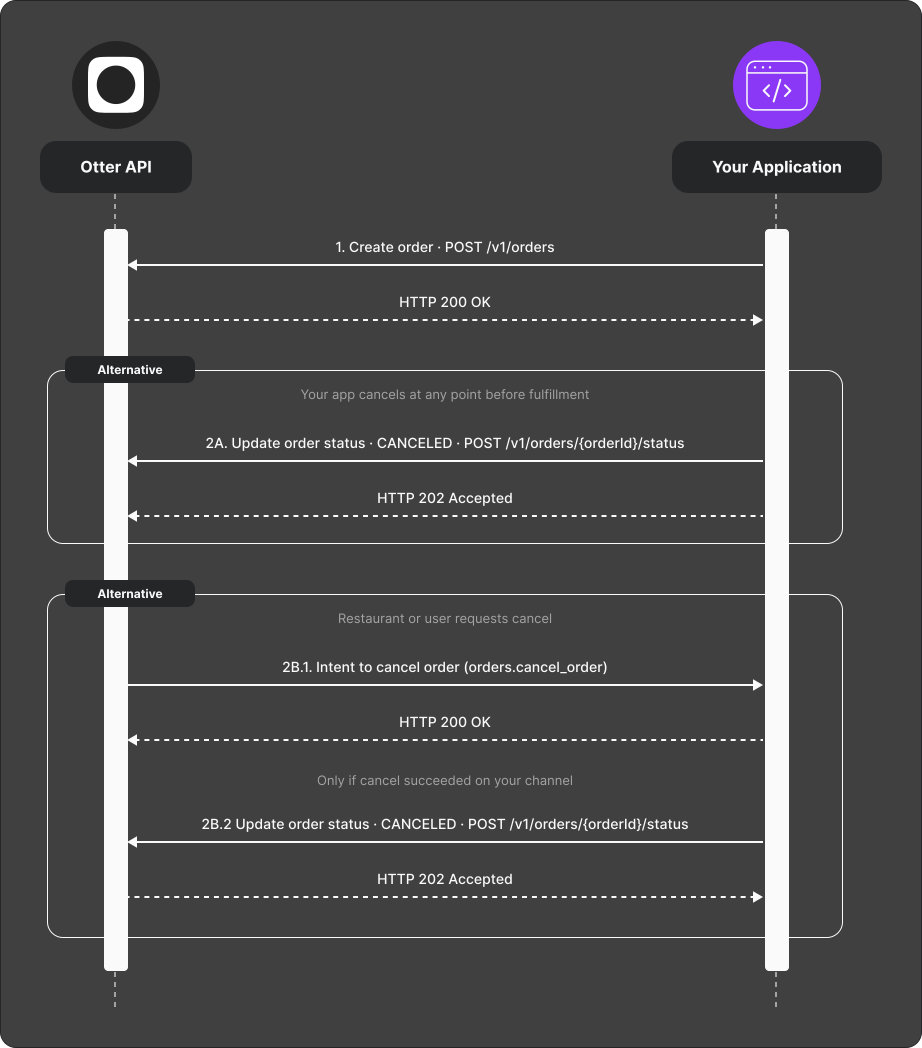
| Endpoint | Purpose |
|---|---|
| [`GET /organization/v1/organization`](/docs/api-reference/reference/organization-get-organization) | Current user’s organization |
| [`GET /organization/v1/organization/brands?limit=100`](/docs/api-reference/reference/organization-list-brands) | List brands |
| [`GET /organization/v1/organization/brands/{brandId}`](/docs/api-reference/reference/organization-get-brand) | Brand detail |
| [`GET /organization/v1/organization/brands/{brandId}/stores?limit=100`](/docs/api-reference/reference/organization-list-stores) | List stores |
| [`GET /organization/v1/organization/brands/{brandId}/stores/{storeId}`](/docs/api-reference/reference/organization-get-store) | Store detail |
## Steps
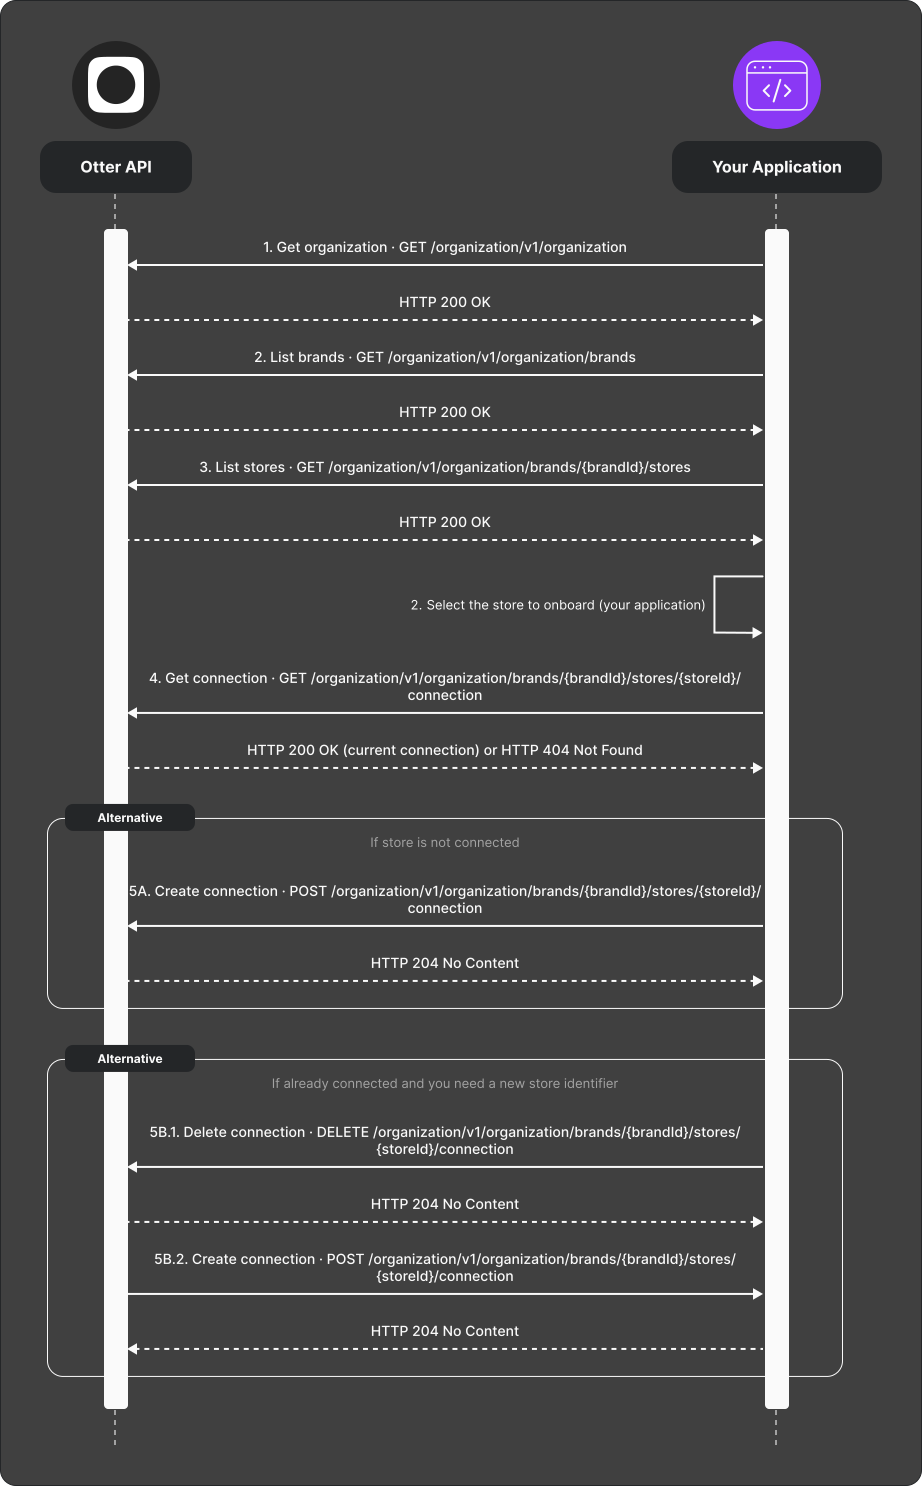
1. Fetch organization structure (endpoints above).
2. Select the store to onboard.
3. [`GET /organization/v1/organization/brands/{brandId}/stores/{storeId}/connection`](/docs/api-reference/reference/organization-get-connection).
4. Connect the store:
- **404** — [`POST /organization/v1/organization/brands/{brandId}/stores/{storeId}/connection`](/docs/api-reference/reference/organization-create-connection) with your `storeId` in the body.
- **Already connected, wrong id** — [`DELETE /organization/v1/organization/brands/{brandId}/stores/{storeId}/connection`](/docs/api-reference/reference/organization-delete-connection), then [`POST`](/docs/api-reference/reference/organization-create-connection) with the new `storeId`.
## Verify
Complete OAuth, connect one store, and confirm store-scoped API calls work with `X-Store-Id`.
## Resources
- [Watch video](https://drive.google.com/file/d/1QmWgCPcqbz3f3ZmOvziv-_ufu7Cn1GKP/preview)
- [Download example application](https://drive.google.com/uc?export=download&id=1oDpym-qk14CJagISnVYdw2jxP-hIrSSN)
## Next
- [Quickstart](guides-quickstart.md)
- [API reference](/docs/api-reference/reference/otter-api)
Otter 101
# Otter 101
An intro to Otter for API partners — how restaurants, applications, and integrations fit together.
Otter helps restaurants run multi-channel operations: orders, menus, storefront availability, delivery, finance, and guest feedback. The **Otter API** lets your product (marketplace, POS, delivery network, back-office tool, and so on) exchange that data with Otter in real time.
You do not build “against a generic food API.” You integrate with a **merchant hierarchy**, scoped by **store**, driven by **your application’s credentials**, and kept in sync with **webhooks**.
## Who builds on Otter
| Partner type | Typical goal |
|---|---|
| Marketplace / channel | Send orders into Otter; keep status and menus in sync |
| POS / kitchen system | Receive orders from Otter; update prep status |
| Delivery / logistics | Quote, create, and update deliveries |
| Ops / finance tools | Reports, payouts, reviews, loyalty |
Most live products use **more than one** domain under **Integrations**.
## Merchant hierarchy
Otter models restaurants in three levels:
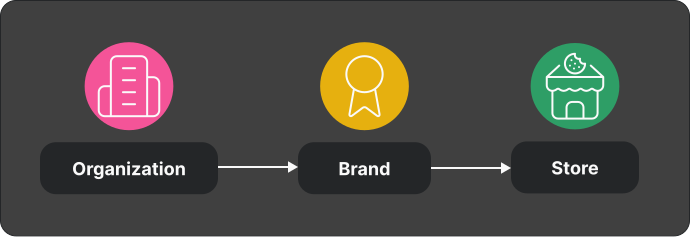
| Concept | Meaning |
|---|---|
| **Organization** | The merchant account a user belongs to |
| **Brand** | A brand under that organization (for example a concept or banner) |
| **Store** | A single restaurant location — the unit most API calls and webhooks act on |
When you onboard via the organization APIs, you browse org → brand → store and create a **connection** that maps Otter’s store to an id in **your** system.
Deep dive: **[Stores and connections](guides-stores-and-connections.md)** (pairing paths, `X-Store-Id`, status).
## Application
Your integration is registered as an **application**.
- You get an **Application ID** and **client secret**.
- Store secrets securely; never commit them to source control or expose them in a browser or mobile app.
- Scopes on the application control which APIs you may call.
Complete [Quickstart](guides-quickstart.md) with a test store before live restaurant traffic.
## Store identity
Once a store is linked to your application, store-scoped requests use the **`X-Store-Id`** header, and webhooks carry store metadata for routing.
If a store is not linked, store-scoped calls fail even with a valid bearer token. Pairing options and details: **[Stores and connections](guides-stores-and-connections.md)**.
## Orders: two directions
Orders are the most common integration. Otter supports two complementary patterns:
| Pattern | When to use | Start here |
|---|---|---|
| **Send into Otter** | Your system is the source of truth (marketplace creates the order) | [Orders (send into Otter)](order-provider-integrations-operations.md) |
| **Receive into your system** | Otter (or another channel) creates the order; your POS/kitchen consumes it | [Orders (receive into your system)](order-consumer-integrations-operations.md) |
In both cases, **status** moves through a shared lifecycle (accept → ready → fulfilled, or canceled). Your app and Otter exchange updates via REST and webhooks. See [Order lifecycle](orders-integrations-lifecycle.md).
## Menus and storefront
| Domain | Role |
|---|---|
| **Menus** | Otter pushes publish / hours / availability events; your app applies them on a target channel |
| **Menus Manager** | Your app owns the catalog, upserts into Otter, then publishes to targets |
| **Storefront** | Hours, open/paused availability, pause and unpause |
Pick **Menus** vs **Menus Manager** based on who is the primary editor of the catalog. See [Menus](menu-integrations-operations.md) and [Menus Manager](menus-manager-integrations-operations.md).
## Events: webhooks
REST is how **you** initiate work. **Webhooks** are how Otter notifies you of work that started elsewhere.
Validate signatures, acknowledge with **2xx**, process asynchronously, and use **error callbacks** where a domain requires them.
Deep dive: **[Events and webhooks](guides-events-and-webhooks.md)**. HMAC samples: [Keep webhooks secure](guides-webhook-authentication.md).
## How an integration fits (recap)
1. **Application** authenticates to the Otter API.
2. **Stores** are linked; requests use `X-Store-Id`.
3. You call **REST** for actions you start; you receive **webhooks** for events Otter or the restaurant start.
4. You implement one or more **Integrations** hubs for your product.
## Next
- **[Quickstart](guides-quickstart.md)** — Credentials, first call, store, webhooks
- **[Authentication](guides-authentication.md)** — API tokens and webhook verification
- **[Events and webhooks](guides-events-and-webhooks.md)** / **[Stores and connections](guides-stores-and-connections.md)** — Core Concepts depth
- **[Overview](overview.md)** — Choose an Integrations hub
- **[API reference](/docs/api-reference/reference/otter-api)** — Payloads, enums, and scopes
Overview
# Overview
Connect Otter to the systems restaurants already use — marketplaces, POS, delivery, back-office tools, and more.
This Guides tab explains **what you can build** and **how the pieces fit together**. For exact request and response shapes, use the [API reference](/docs/api-reference/reference/otter-api).
## Get familiar with Otter
- **[Otter 101](otter-101.md)** — Organizations, brands, stores, applications, orders, menus, and webhooks.
- **[Authentication](guides-authentication.md)** — API tokens outbound; webhook verification inbound.
- **[Events and webhooks](guides-events-and-webhooks.md)** / **[Stores and connections](guides-stores-and-connections.md)** — Shared event and pairing primitives.
- **[Quickstart](guides-quickstart.md)** — Register your app, connect a store, call the API, and verify a webhook.
- **[Use these docs with AI](guides-ai-coding-agents.md)** — Connect Cursor, Claude Code, or similar tools to the live guides and OpenAPI.
## Choose by application type
Use a scenario roadmap to combine the relevant integration guides into one certification-readiness path.
- **[Online food ordering (OFO)](scenarios-ofo.md)** — Send orders into Otter and keep menus and storefront state synchronized.
- **[Point of sale (POS)](scenarios-pos.md)** — Receive orders from Otter and publish your POS-owned menu through Menus Manager.
- **[Third-party logistics (3PL)](scenarios-3pl.md)** — Quote, accept, update, and complete or cancel deliveries.
- **[Compare all scenarios](scenarios.md)** — Review shared prerequisites, reliability expectations, and certification evidence.
## What do you want to build?
Start with a use-case hub. Most products use more than one. Full list lives under **Integrations** in the sidebar.
- **Orders — [send into Otter](order-provider-integrations-operations.md)** — Push marketplace or channel orders into Otter and keep status in sync.
- **Orders — [receive into your system](order-consumer-integrations-operations.md)** — Ingest Otter-created orders (for example into a POS) and handle status notifications.
- **[Menus & availability](menu-integrations-operations.md)** — Keep menus, hours, and availability accurate when Otter pushes changes to your service.
- **[Menus Manager](menus-manager-integrations-operations.md)** — Own the menu catalog in your app, sync with Otter, and publish to targets.
- **[Delivery](delivery-integrations-operations.md)** — Quotes, create, updates, and cancel with your logistics partner.
- **[Storefront](storefront-integrations-operations.md)** — Hours, availability, and pause/unpause.
- **[Finance & reviews](finance-integration-operations.md)** — Financial transactions and guest feedback ([Reviews](reviews-integration-operations.md)).
- **[Organization](organization-integrations-onboarding-flow.md)** — Onboard an organization and manage store connections.
## Already set up?
- **Core Concepts:** [Otter 101](otter-101.md), [Authentication](guides-authentication.md), [Events and webhooks](guides-events-and-webhooks.md), [Stores and connections](guides-stores-and-connections.md), [Understand rate limits](guides-rate-limiting.md), [Keep webhooks secure](guides-webhook-authentication.md).
- Pick a hub under **Integrations** and follow its Integration overview, then the how-tos.
- Stay in the [API reference](/docs/api-reference/reference/otter-api) for payloads, enums, and scopes.
Reviews
# Reviews
Post public replies to customer reviews (immediately or on a schedule).
## Overview
Use the Reviews API when your integration responds to ratings on behalf of merchants. Replies can be sent now or scheduled for later.
## What you can call
| Capability | Notes |
|---|---|
| Reply immediately | Returns the target service's opaque `replyId` after the provider accepts the reply and Otter records it |
| Schedule a reply | Pass an integer Unix timestamp in seconds as `scheduledAt`; success confirms scheduling only and does not return an eventual `replyId` |
Details: [API reference](/docs/api-reference/reference/otter-api).
Reply-size limits vary by `serviceSlug` and are measured in UTF-8 bytes. The
Public Reviews API does not expose reply editing, deletion, scheduled-reply
cancellation, or scheduled-operation status.
Current write-capable service limits are:
| Maximum UTF-8 bytes | Service slugs |
|---|---|
| 250 | `grubhub`, `grubhubweb` |
| 300 | `coupangeats`, `deliveroo`, `deliveroo-web`, `doordash`, `doordash-api`, `ubereats`, `ubereats-api` |
| 1000 | `baemin`, `ddangyo-api`, `naver`, `yogiyo`, `yogiyo-api` |
Confirm the configured limit during onboarding before treating it as a stable
target-service contract.
## Related
- [Reply to a review](reviews-integrations-reply-to-a-review-flow.md)
## Next
Implement [Reply to a review](reviews-integrations-reply-to-a-review-flow.md).
Reply to a review
# Reply to a review
Post a merchant response to a customer review, optionally at a scheduled time.
## Before you begin
- `reviewId`, `externalStoreId`, `serviceSlug`, and reply text from your workflow
- API credentials with reviews scope (see [API reference](/docs/api-reference/reference/otter-api))
## Steps
1. Call the reply endpoint with `reviewId`, `externalStoreId`, `serviceSlug`, and `replyText`.
2. On an immediate reply, success means the target service accepted the reply
and Otter recorded it. The API returns the target service's opaque `replyId`.
3. **Optional — schedule:** include `scheduledAt` as an integer Unix timestamp
in seconds. Success confirms that the task was scheduled, not that the
provider posted the reply. The response has a null `replyId`, and the Public
Reviews API does not expose the eventual ID or scheduled-operation status.
Scheduled execution is approximate and can occur after the requested timestamp.
Reply-size limits are specific to `serviceSlug` and measured in UTF-8 bytes.
Confirm the applicable limit during onboarding.
## Verify
Post a test immediate reply and confirm it appears on the target channel. For a
scheduled reply, verify the target channel after the requested time; the
original response does not prove that later execution succeeded.
Do not automatically retry an ambiguous response. The endpoint has no
idempotency key, and a retry can create another reply attempt.
## Next
- [Reviews overview](reviews-integration-operations.md)
Reviews Documentation
# Reviews Documentation
Scenarios
# Scenarios
Choose the application type that best matches the system you are connecting to Otter. Each scenario combines the existing domain guides into an end-to-end implementation roadmap and a certification-readiness checklist.
These checklists describe the baseline supported by the current Otter API documentation. Confirm final certification requirements and submission timing with your Otter representative before you submit.
## Choose your application type
| Application type | Use this when | Main implementation paths |
|---|---|---|
| [Online food ordering (OFO)](scenarios-ofo.md) | Your marketplace or ordering channel sends orders into Otter and receives menu and storefront changes | Orders into Otter, Menus, Storefront |
| [Point of sale (POS)](scenarios-pos.md) | Your POS receives orders from Otter and is the source of truth for menus | Orders into your system, Menus Manager |
| [Third-party logistics (3PL)](scenarios-3pl.md) | Your delivery network quotes, accepts, and fulfills delivery jobs | Delivery quotes, creation, updates, and cancellation |
If your product spans more than one type, complete every applicable roadmap. Use the [Integrations](index.md#what-do-you-want-to-build) guides for capabilities outside these three baseline scenarios.
## Shared readiness baseline
Complete these steps before the type-specific roadmap:
1. Register your application and store its Application ID and client secret securely. Start with [Quickstart](guides-quickstart.md).
2. Request only the OAuth scopes your application needs and obtain access tokens as described in [Authentication](guides-authentication.md).
3. Connect your application to at least one existing Otter store as described below.
4. Register a public HTTPS webhook endpoint, [validate every webhook signature](guides-webhook-authentication.md), and acknowledge accepted events with a successful response.
5. Process webhook work asynchronously, make handlers safe for duplicate delivery, and retain enough context to retry failed work. See [Events and webhooks](guides-events-and-webhooks.md).
6. Respect [rate limits](guides-rate-limiting.md) and use backoff for retryable API failures.
## Connect to an existing store
Otter creates and manages restaurant stores. An external integration does not create an Otter store; it connects its application and external store id to a store that already exists in Otter.
Complete this connection before starting the OFO or POS roadmap:
1. Follow [Stores and connections](guides-stores-and-connections.md) to choose the appropriate account-pairing path.
2. Work with your Account Representative or complete [Organization onboarding](organization-integrations-onboarding-flow.md) so your application is connected to an existing Otter store.
3. Preserve the Otter-to-external store mapping so store-scoped API calls, orders, menus, and webhooks resolve to the same location.
4. When a store connection is removed, clear the local mapping without deleting the store in your system.
The connection is ready when:
- [ ] A store-scoped API call accepts the connected store id in `X-Store-Id`.
- [ ] OFO traffic resolves to the same external store used for the connection.
- [ ] POS order and menu traffic resolve to the same POS location.
- [ ] Repeated connection updates refresh the existing mapping instead of creating duplicates.
- [ ] Removing a connection clears the mapping without deleting either system's store record.
## Reliability expectations
- Keep credentials, hosts, stores, and webhook secrets aligned with the application you are testing.
- Correlate each API request, webhook, callback, and asynchronous job in your logs.
- Treat duplicate events and repeated callbacks as expected delivery behavior.
- Distinguish retryable transport failures from payload or business-rule failures.
- Preserve the original event and the result of each processing attempt for troubleshooting.
- Test both successful and failed paths before requesting certification.
## Evidence to collect
Prepare a compact evidence package for your Otter representative:
- Application and store identifiers used for the test.
- Request ids, webhook ids, delivery references, order ids, and menu job ids that identify each tested flow.
- Successful API responses and callback results for the primary path.
- Logs showing webhook signature validation and prompt acknowledgement.
- Evidence that duplicate delivery and retryable failures do not create duplicate business actions.
- Expected error responses and the corrective or retry behavior your application performed.
- Final order, menu job, storefront, or delivery state for every required scenario.
Do not include client secrets, access tokens, webhook secrets, or customer personal data in the evidence package.
## Submit for certification
Review the checklist in your application-type guide, resolve any failed test case, and share the evidence package with your Otter representative. Your representative will confirm the current certification scope, any product-specific exceptions, and the submission process.
## Next
- [Build an online food ordering application](scenarios-ofo.md)
- [Build a point-of-sale application](scenarios-pos.md)
- [Build a third-party logistics application](scenarios-3pl.md)
- [Browse the API reference](/docs/api-reference/reference/otter-api)
Build a third-party logistics application
# Build a third-party logistics application
Use this roadmap when your third-party logistics (3PL) application quotes, accepts, and fulfills delivery jobs for Otter. A certification-ready 3PL flow supports quoting, delivery creation, live updates, update requests, cancellation, errors, and both successful and canceled terminal states.
Quote support is part of this baseline. Confirm the final requirements for your product with your Otter representative before you submit for certification.
## Before you begin
- Complete the [shared readiness baseline](scenarios.md#shared-readiness-baseline).
- Configure signed delivery webhooks for your application.
- Define how your delivery ids map to Otter delivery reference ids.
- Map your courier lifecycle to `ALLOCATED`, `PICKED_UP`, `COMPLETED`, and `CANCELED`.
- Define quote expiration, service-level, currency, and estimate behavior.
## How it fits
### Quote and delivery creation

### Delivery updates and cancellation

## Implementation roadmap
### 1. Quote every supported delivery
Handle [Request delivery quotes (`delivery.request_quote`)](/docs/api-reference/reference/request-delivery-quotes-webhook). Return available options through [`POST /v1/delivery/{deliveryReferenceId}/quotes`](/docs/api-reference/reference/request-delivery-quote-callback), including stable quote ids and valid estimates.
Make repeated quote requests safe and return explicit errors when your service cannot quote the delivery.
### 2. Accept and allocate the delivery
Handle [Accept delivery (`delivery.accept`)](/docs/api-reference/reference/accept-delivery-webhook). Reserve the selected service in your system, then call [`POST /v1/delivery/{deliveryReferenceId}/accept`](/docs/api-reference/reference/accept-delivery-callback) with committed estimates and status `ALLOCATED`.
Follow [Create a delivery](delivery-integrations-creation-flow.md) for the complete sequence.
### 3. Publish live updates
Call [`PUT /v1/delivery/{deliveryReferenceId}/status`](/docs/api-reference/reference/update-delivery-status) whenever status, address, courier, vehicle, notes, or estimates change. Keep updates ordered and continue until the delivery reaches `COMPLETED` or `CANCELED`.
### 4. Handle update requests
Process [Update delivery request (`delivery.update_request`)](/docs/api-reference/reference/update-delivery-request-webhook), apply supported changes, and reply through [`POST /v1/delivery/{deliveryReferenceId}/update`](/docs/api-reference/reference/update-delivery-request-callback). See [Handle delivery update requests](delivery-integrations-update-request-flow.md).
### 5. Handle cancellation
Process [Cancel delivery (`delivery.cancel`)](/docs/api-reference/reference/cancel-delivery-webhook), stop the job when allowed, and reply through [`POST /v1/delivery/{deliveryReferenceId}/cancel`](/docs/api-reference/reference/cancel-delivery-callback). See [Cancel a delivery](delivery-integrations-cancellation-flow.md).
### 6. Report failures
When a webhook-triggered operation cannot complete, call [`POST /v1/delivery/callback/error`](/docs/api-reference/reference/delivery-callback-error) with the matching delivery reference and actionable details. Follow [Handle delivery errors](delivery-integrations-error-event-flow.md).
## Readiness checklist
- [ ] Quote requests return valid options, estimates, prices, currencies, and stable quote ids.
- [ ] Repeated quote and accept events do not create duplicate reservations or delivery jobs.
- [ ] Accepted deliveries enter `ALLOCATED` with committed pickup and drop-off estimates.
- [ ] Status updates preserve the delivery reference and follow a valid lifecycle.
- [ ] Courier, vehicle, address, notes, and estimate updates reach the correct delivery.
- [ ] Update requests return a success callback or an explicit error callback.
- [ ] Cancellation succeeds before completion and leaves both systems in `CANCELED`.
- [ ] Successful delivery reaches `COMPLETED` in both systems.
- [ ] Webhook signatures, duplicate delivery, rate limits, and retryable API failures are handled.
## Test before certification
1. Receive a quote request and return at least one valid option.
2. Replay the quote request and verify that the result remains safe and traceable.
3. Accept a selected quote and verify that only one delivery job is allocated.
4. Move the delivery through `ALLOCATED`, `PICKED_UP`, and `COMPLETED`, including courier and estimate updates.
5. Create a second delivery, apply an update request, then cancel it before completion.
6. Trigger one unsupported or invalid operation and verify that the error callback identifies the correct delivery.
7. Replay an accept, update, and cancel event and verify that no duplicate action occurs.
## Evidence to collect
- Delivery reference ids, quote ids, and provider delivery ids for every tested flow.
- Quote and accept webhook ids with their callback responses.
- Ordered status-update evidence for successful and canceled lifecycles.
- Before-and-after evidence for one delivery update request.
- Error callback evidence for one expected failure.
- Signature-validation, duplicate-delivery, retry, and terminal-state logs.
- The shared evidence listed in [Scenarios](scenarios.md#evidence-to-collect).
## Common failures
| Symptom | Likely cause | Fix |
|---|---|---|
| Quote cannot be selected | The quote is no longer pending, a newer quote request superseded it, or the id cannot be resolved | Keep quote ids stable and treat each new quote request as replacing earlier pending quotes |
| Duplicate courier job appears | Accept event was processed more than once | Deduplicate by delivery reference and selected quote before reserving a courier |
| Update targets the wrong job | Provider id is used without the Otter delivery reference mapping | Persist and use both identifiers on every callback and update |
| Delivery remains in `ALLOCATED` | Status publisher stopped or updates were rejected | Retry transient failures and monitor for stale non-terminal deliveries |
| Cancellation and completion race | Terminal transitions are not serialized | Apply one terminal state and treat later terminal events idempotently |
## Next
- [Delivery overview](delivery-integrations-operations.md)
- [Create a delivery](delivery-integrations-creation-flow.md)
- [Handle delivery update requests](delivery-integrations-update-request-flow.md)
- [Cancel a delivery](delivery-integrations-cancellation-flow.md)
- [Scenarios overview](scenarios.md)
- [API reference](/docs/api-reference/reference/otter-api)
Build an online food ordering application
# Build an online food ordering application
Use this roadmap when your online food ordering (OFO) application is a marketplace or ordering channel that sends orders into Otter. A certification-ready OFO flow keeps orders, menus, hours, item availability, and storefront status synchronized for every connected store.
Confirm the final requirements for your product with your Otter representative before you submit for certification.
## Before you begin
- Complete the [shared readiness baseline](scenarios.md#shared-readiness-baseline).
- Configure webhook subscriptions for orders, menus, and storefront events.
- Define stable external order IDs and status mappings before sending test traffic.
## How it fits
### Apply menu changes

### Send orders into Otter

### Keep storefront state aligned
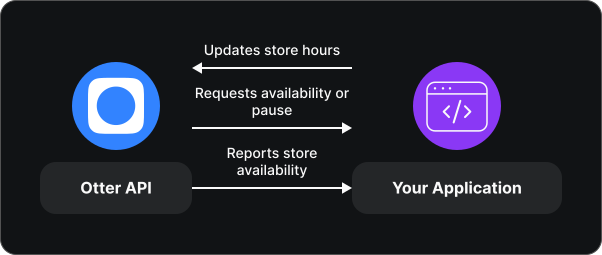
## Implementation roadmap
### 1. Apply menu changes
Implement the webhook and callback pair for each baseline menu capability:
- [Menu Publish (`menus.menu_publish`)](/docs/api-reference/reference/menu-publish-webhook) and [`POST /v1/menus/publish`](/docs/api-reference/reference/menu-publish-callback).
- [Menu upsert hours (`menus.upsert_hours`)](/docs/api-reference/reference/upsert-menu-hours-webhook) and [`POST /v1/menus/hours`](/docs/api-reference/reference/menu-upsert-hours).
- [Update menu entities availabilities (`menus.update_menu_entities_availabilities`)](/docs/api-reference/reference/update-menu-entities-availabilities-webhook) and [`POST /v1/menus/entity/availability/bulk`](/docs/api-reference/reference/update-menu-entities-availabilities-callback).
Apply the change in your OFO before sending a success callback. Use [Handle failed events](menus-integrations-failed-event-flow.md) when the target rejects the operation.
### 2. Send orders into Otter
Create each marketplace order with [`POST /v1/orders`](/docs/api-reference/reference/create-order). Use stable external ids, preserve the returned order id, and follow [Create an order](orders-integrations-creation-flow.md) for the required sequence.
Handle [Order status update (`orders.order_status_update`)](/docs/api-reference/reference/order-status-update-webhook) and the cancellation behavior described in [Order lifecycle](orders-integrations-lifecycle.md). When your workflow advances or cancels the order, call [`POST /v1/orders/{orderId}/status`](/docs/api-reference/reference/update-order-status).
### 3. Keep storefront state aligned
Send store hours with [`POST /v1/storefront/hours`](/docs/api-reference/reference/post-store-hours-configuration-change). Respond to [Get store availability (`storefront.get_store_availability`)](/docs/api-reference/reference/get-store-availability-webhook), [Pause store (`storefront.pause_store`)](/docs/api-reference/reference/pause-store-webhook), and [Unpause store (`storefront.unpause_store`)](/docs/api-reference/reference/unpause-store-webhook).
Use [`POST /v1/storefront/availability`](/docs/api-reference/reference/post-store-availability-change) when your OFO proactively changes whether a store can accept orders. See the [Storefront overview](storefront-integrations-operations.md) for the complete sequence.
## Readiness checklist
- [ ] A valid order is created once, even when your client retries a request.
- [ ] Order status and cancellation events update the correct order.
- [ ] Menu publish, hours, and entity availability changes reach the correct store and return the matching callback.
- [ ] Failed menu operations return actionable error information instead of a false success.
- [ ] Storefront hours and availability are configured before availability polling begins.
- [ ] Pause and unpause events change ordering availability and remain safe when delivered more than once.
- [ ] Webhook signatures, duplicate delivery, rate limits, and retryable API failures are handled.
## Test before certification
1. Create an order, move it through accepted, prepared, and fulfilled states, and verify every status event.
2. Cancel a separate order and verify both systems reach the same terminal state.
3. Publish a small menu, update its hours, suspend one item, and verify every callback.
4. Configure storefront hours, test available and unavailable states, then process pause and unpause events.
5. Replay one event from each domain and verify that no duplicate order or target-side action is created.
## Evidence to collect
- Order ids and request ids for successful, canceled, and replayed orders.
- Webhook ids and callback responses for menu publish, hours, and availability.
- Storefront payloads and resulting open, unavailable, paused, and unpaused states.
- Signature-validation, duplicate-delivery, retry, and error-path logs.
- The shared evidence listed in [Scenarios](scenarios.md#evidence-to-collect).
## Common failures
| Symptom | Likely cause | Fix |
|---|---|---|
| Store-scoped requests return `403` | The existing store connection is missing or the external id is stale | Reconcile the mapping in [Connect to an existing store](scenarios.md#connect-to-an-existing-store) |
| Create retry returns `409 Conflict` | The external order id already exists | Treat the original create as the business action and reconcile by the stored external id |
| Menu callback reports success before the target changes | Callback is sent before target processing completes | Send success only after the OFO applies and verifies the change |
| Availability is rejected | Storefront hours were not configured first | Call the hours endpoint before availability operations |
| Events stop processing during a spike | Work is handled synchronously or without backoff | Acknowledge quickly, queue work, and respect [rate limits](guides-rate-limiting.md) |
## Next
- [Orders: send into Otter](order-provider-integrations-operations.md)
- [Menus](menu-integrations-operations.md)
- [Storefront](storefront-integrations-operations.md)
- [Scenarios overview](scenarios.md)
- [API reference](/docs/api-reference/reference/otter-api)
Build a point-of-sale application
# Build a point-of-sale application
Use this roadmap when your point-of-sale (POS) or kitchen system receives orders from Otter and owns the menu catalog. A certification-ready POS flow ingests each order once, tracks status changes, and publishes the POS menu into Otter through Menus Manager.
Confirm the final requirements for your product with your Otter representative before you submit for certification.
## Before you begin
- Complete the [shared readiness baseline](scenarios.md#shared-readiness-baseline).
- Configure signed order webhooks.
- Assign stable POS ids to menus, categories, items, modifier groups, and modifiers.
- Define how Otter order and menu states map to your POS states.
## How it fits
### Publish the POS-owned menu
### Menu publication flow

### Receive orders from Otter

See [Orders: receive into your system](order-consumer-integrations-operations.md) for the inbound order flow.
## Implementation roadmap
### 1. Publish the POS-owned menu
Use Menus Manager because the POS is the source of truth:
1. Create or update the catalog with [`POST /v1/menus`](/docs/api-reference/reference/upsert-menu).
2. Poll [`GET /v1/menus/jobs/{jobId}`](/docs/api-reference/reference/get-async-job-status) until the job reaches `SUCCESS` or `FAILED`.
3. Follow [Publish menus to a target](menus-manager-integrations-publish-menus-to-target-flow.md) and verify the target job succeeds.
4. Use [Suspend or unsuspend entities](menus-manager-integrations-suspend-unsupend-menu-entities-flow.md) with the same stable entity ids, then republish so targets receive the change.
Do not use the Otter-to-target Menus flow as the POS catalog source in this scenario.
### 2. Receive orders from Otter
Handle [Orders creation (`orders.new_order`)](/docs/api-reference/reference/order-create-webhook), validate the signature before parsing the payload, and create the order once in the POS. Follow [Handle create events](orders-integrations-create-event-flow.md) for acknowledgement and processing behavior.
Handle [Order status update (`orders.order_status_update`)](/docs/api-reference/reference/order-status-update-webhook) and apply transitions to the same POS order. Preserve unknown or out-of-order transitions for investigation instead of silently replacing the current state.
## Readiness checklist
- [ ] New-order webhooks create one POS order when delivered once, more than once, or after a retry.
- [ ] Status events update the existing order and preserve a trace of every transition.
- [ ] Unsupported payloads fail visibly and retain enough context for troubleshooting.
- [ ] A POS menu upsert reaches a terminal asynchronous job state.
- [ ] Published menus match POS categories, items, modifier groups, prices, and availability.
- [ ] Suspending and unsuspending an entity uses stable ids and propagates after republishing.
- [ ] Webhook signatures, duplicate delivery, rate limits, and retryable API failures are handled.
## Test before certification
1. Receive a test order, acknowledge it promptly, and confirm the complete order appears in the POS.
2. Replay the new-order event and verify that the POS does not create a duplicate order.
3. Process status events, including a terminal state, and verify the correct POS order changes.
4. Upsert a representative menu and poll until the job reaches `SUCCESS`.
5. Publish the menu to one target, suspend an item, republish, then unsuspend and republish it.
6. Submit an invalid menu payload and retain the failed job details for troubleshooting.
## Evidence to collect
- Webhook ids and POS order ids for original, replayed, and terminal-state events.
- Logs showing signature validation, prompt acknowledgement, and asynchronous processing.
- Menu upsert and publish job ids with final `SUCCESS` or expected `FAILED` results.
- Before-and-after evidence for one suspended and unsuspended menu entity.
- The shared evidence listed in [Scenarios](scenarios.md#evidence-to-collect).
## Common failures
| Symptom | Likely cause | Fix |
|---|---|---|
| Duplicate POS order appears | Webhook id or external order id is not used for deduplication | Store a stable deduplication key before processing the order |
| Event acknowledgement times out | POS work runs inside the webhook request | Validate, persist, acknowledge, then process asynchronously |
| Menu job reaches `FAILED` | Invalid shape or inconsistent entity ids | Inspect the job error and compare the payload with the [API reference](/docs/api-reference/reference/otter-api) |
| Publish target is missing | The store is not linked to the target service | Verify store pairing before publishing |
| Availability change does not propagate | Entity ids changed or the menu was not republished | Reuse upsert ids and publish after suspend or unsuspend |
## Next
- [Orders: receive into your system](order-consumer-integrations-operations.md)
- [Menus Manager](menus-manager-integrations-operations.md)
- [Stores and connections](guides-stores-and-connections.md)
- [Scenarios overview](scenarios.md)
- [API reference](/docs/api-reference/reference/otter-api)
Store
# Store
Read Otter store metadata only when your integration specifically needs it.
## Overview
Most partner work uses [Stores and connections](guides-stores-and-connections.md) to link locations and pass `X-Store-Id`. A separate **get store info** call (`GET /v1/store/store-info`, scope `store.read`) exists in the platform but is **hidden from the published API reference** — do not treat it as a public Guides surface.
## Prefer store connection guides
| Need | Where to go |
|---|---|
| Link stores and choose a pairing path | [Stores and connections](guides-stores-and-connections.md) |
| Organization-authorized onboarding | [Onboard an organization](organization-integrations-onboarding-flow.md) |
| Field-level contracts for other products | [API reference](/docs/api-reference/reference/otter-api) |
## Next
- [Stores and connections](guides-stores-and-connections.md)
- [Quickstart](guides-quickstart.md)
Get store availability
# Get store availability
Report whether a store is open, paused, or otherwise unavailable when Otter asks on a schedule.
## Before you begin
- Store hours sent via [`POST /v1/storefront/hours`](/docs/api-reference/reference/post-store-hours-configuration-change) ([Storefront overview](storefront-integrations-operations.md))
- Webhook receiver registered
## Steps
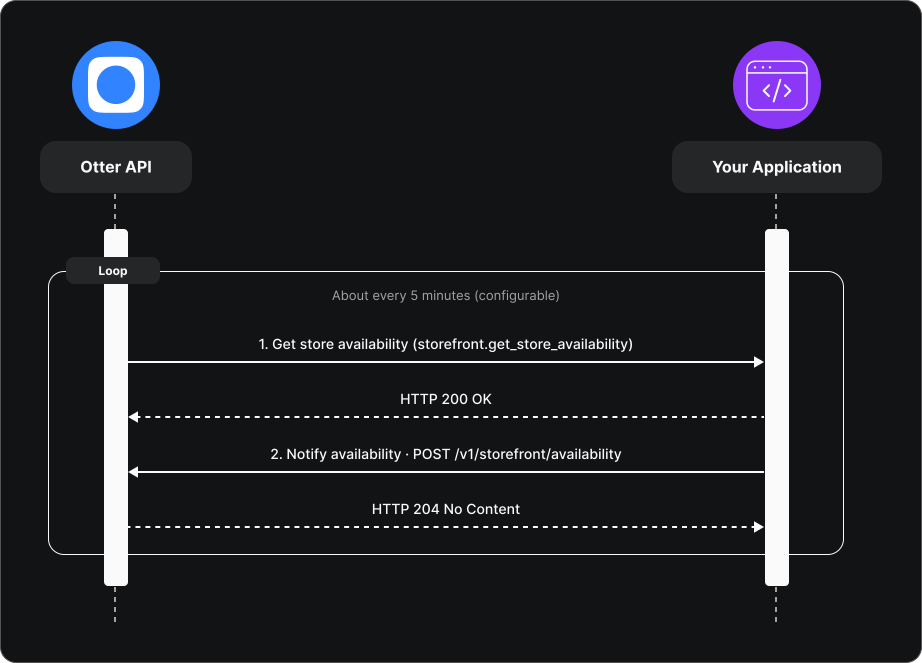
1. Otter sends a [Get store availability (`storefront.get_store_availability`)](/docs/api-reference/reference/get-store-availability-webhook) webhook (default about every 5 minutes; configurable in Otter Developer Portal).
2. Read current state from your storefront (preferred) or your internal source of truth.
3. POST current state to [`POST /v1/storefront/availability`](/docs/api-reference/reference/post-store-availability-change).
**Tip:** If availability POST fails because hours are missing, set hours with [`POST /v1/storefront/hours`](/docs/api-reference/reference/post-store-hours-configuration-change) and retry.
## Verify
After configuring hours, confirm periodic webhooks arrive and your availability POST succeeds.
## Common failures
| Symptom | Likely cause | Fix |
|---|---|---|
| Availability rejected | Hours not configured | POST hours first |
| Stale state in Otter | Not reading live storefront status | Query target system on each webhook |
## Next
- [Pause or unpause](storefront-integrations-pause-unpause-event-flow.md)
- [Storefront overview](storefront-integrations-operations.md)
Storefront
# Storefront
Keep store hours, availability, and pause state aligned between Otter and your online storefront.
## Overview
Use storefront APIs when you operate the customer-facing store status (open, paused, hours). Otter may poll availability on a schedule or ask you to pause/unpause via webhooks.
## How it fits

## Integration overview
1. Send store hours with [`POST /v1/storefront/hours`](/docs/api-reference/reference/post-store-hours-configuration-change) (required before availability calls).
2. Respond to [Get store availability (`storefront.get_store_availability`)](/docs/api-reference/reference/get-store-availability-webhook) webhooks (default ~every 5 minutes) — see [Get store availability](storefront-integrations-get-store-availability-event-flow.md).
3. Handle [Pause store (`storefront.pause_store`)](/docs/api-reference/reference/pause-store-webhook) / [Unpause store (`storefront.unpause_store`)](/docs/api-reference/reference/unpause-store-webhook) when operators change state in Otter — see [Pause or unpause](storefront-integrations-pause-unpause-event-flow.md).
4. Optionally push proactive updates with [`POST /v1/storefront/availability`](/docs/api-reference/reference/post-store-availability-change).
## Test
- Configure hours, then post availability; confirm Otter accepts the payload.
- Pause a test store and complete the availability follow-up webhook.
## Related
- [API reference](/docs/api-reference/reference/otter-api)
## Next
Implement hours + [Get store availability](storefront-integrations-get-store-availability-event-flow.md) before pause/unpause.
Pause or unpause
# Pause or unpause
Pause or resume a store on your storefront when an operator requests it in Otter.
## Before you begin
- [Get store availability](storefront-integrations-get-store-availability-event-flow.md) implemented (required for pause/unpause)
- Hours configured on the storefront integration
## Steps
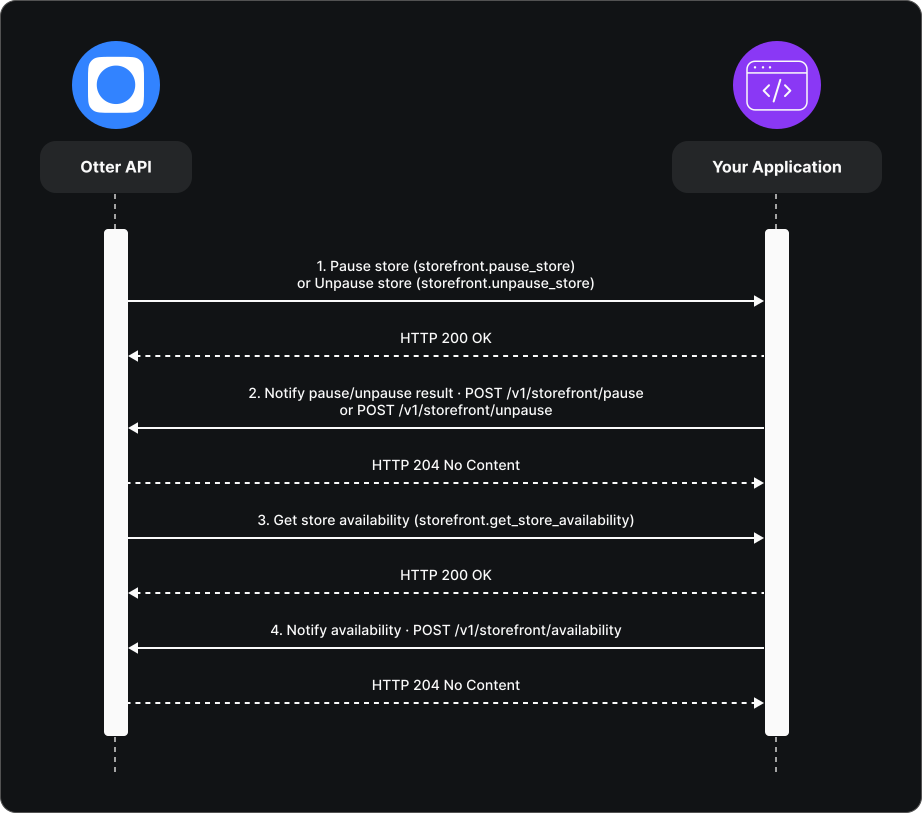
1. Otter sends a [Pause store (`storefront.pause_store`)](/docs/api-reference/reference/pause-store-webhook) or [Unpause store (`storefront.unpause_store`)](/docs/api-reference/reference/unpause-store-webhook) webhook.
2. Apply pause or unpause on your storefront.
3. POST result to [`POST /v1/storefront/pause`](/docs/api-reference/reference/post-pause-store-event-result) or [`POST /v1/storefront/unpause`](/docs/api-reference/reference/post-unpause-store-event-result).
4. Otter sends a [Get store availability (`storefront.get_store_availability`)](/docs/api-reference/reference/get-store-availability-webhook) webhook — respond with [`POST /v1/storefront/availability`](/docs/api-reference/reference/post-store-availability-change).
## Verify
Pause a test store in Otter; confirm storefront pauses, callbacks succeed, and a follow-up availability sync shows paused state.
## Common failures
| Symptom | Likely cause | Fix |
|---|---|---|
| Pause ignored | Availability flow not implemented | Complete [Get store availability](storefront-integrations-get-store-availability-event-flow.md) first |
| Otter still shows open | Skipped step 4 | Always post availability after pause/unpause |
## Next
- [Storefront overview](storefront-integrations-operations.md)